SingleStoreDB Notebook Basics
Notebook
Note
This notebook can be run on a Free Starter Workspace. To create a Free Starter Workspace navigate to Start using the left nav. You can also use your existing Standard or Premium workspace with this Notebook.
Prototyping applications or analyzing datasets using notebooks in SingleStoreDB Cloud follows the same general principles as developing with a Jupyter Notebook. SingleStoreDB Cloud supports internal and external datasources. Internal datasources are databases that exist within your workspace. An external datasource could be an AWS S3 bucket for example. In this Notebook we cover:
Connecting to a SingleStoreDB instance
Connecting to an external datasource including firewall Settings
Using SQL in a cell
Using Python in a cell
Using both SQL & Python
Installing Libraries
Using Magic Commands
To learn more about working with SingleStoreDB notebooks check out our docs!
1. Connecting to SingleStoreDB
Once you select a workspace, you can access all of the databases attached to that workspace. You cannot connect to databases that are not attached to the workspace you are using.
First select a workspace and the information_schema database from the drop-down menu at the top of this notebook.

With the database selected, the connection_url variable in the Python enviroment is now updated with that information
and we can use the %%sql magic command to query the selected database.
In [1]:
1%%sql2SELECT * FROM users3 LIMIT 3;
When running SQL commands against a different database explicitly, you can specify the database in your
SQL code with the USE command:
In [2]:
1%%sql2USE information_schema;3
4SELECT * FROM users5    LIMIT 3;
Alternatively, you can specify the database prefix on the table in the query itself.
In [3]:
1%%sql2SELECT * FROM information_schema.users3 LIMIT 3;
Connecting with SQLAlchemy
You can also connect to your SingleStoreDB datasource using Python and SQLAlchemy. As mentioned above,
the connection_url variable is automatically populated by the notebook environment when selecting a
database in the drop-down menu at the top of the notebook.
In [4]:
1import sqlalchemy as sa2
3sa_conn = sa.create_engine(connection_url).connect()
You can also explicitly define a URL using the individual connection components.
In [5]:
1database_name = "information_schema"2
3connection_url2 = f"singlestoredb://{connection_user}:{connection_password}@{connection_host}:{connection_port}/{database_name}"4
5url_conn = sa.create_engine(connection_url2).connect()
In addition, the SingleStoreDB Python package includes a wrapper create_engine function that
uses the SINGLESTOREDB_URL without having to specify connection_url.
In [6]:
1import singlestoredb as s22
3conn = s2.create_engine().connect()
Using conn, we can run our queries much like the %%sql command.
In [7]:
1query1 = sa.text('SELECT * FROM users LIMIT 3;')2
3for row in conn.execute(query1):4    print(row)
2. Connecting to an external datasource
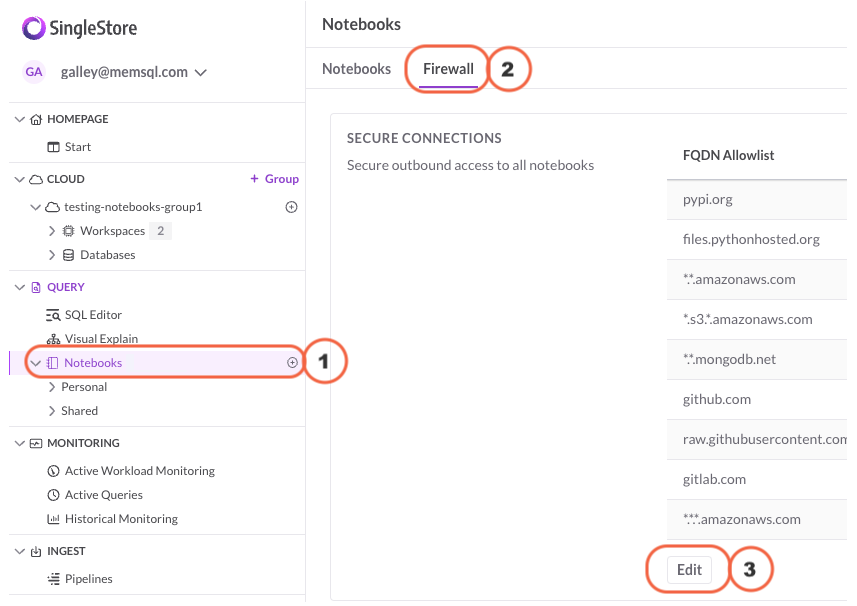
You can securely connect to external endpoints from your SingleStoreDB notebooks. By default, connections are limited to SingleStoreDB databases; however, you can enable and disable connections to other external endpoints via the allowlist. To add or remove endpoints from the allowlist:
Select Edit Firewall at the top-left of this notebook.

Select Edit to add new endpoints:

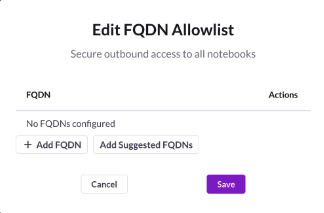
In the Edit Allowlist dialog, you can add a Fully Qualified Domain Name (FQDN) or select from a list of suggested FQDNs (for example
pypi.orgorgithub.com). You can provide wildcard access to an endpoint by using the*character. For example, to access an AWS S3 endpoints, you can use the following syntax:*.s3.*.amazonaws.comSelect Save.

3. Using SQL
The default language for SingleStoreDB Cloud notebooks is Python. However, the %%sql magic command can be used to
submit SQL code for an entire cell.
In [8]:
1%%sql2SELECT * FROM users3 LIMIT 3;
By default, the results are displayed as a table. We can also store the result in a variable for use later in the
notebook. The following code includes the result1 << syntax which indicates that the output of the SQL code
should be stored in the result variable in the Python environment.
In [9]:
1%%sql result1 <<2SELECT * FROM users3 LIMIT 3;
We now have access to the result variable and can convert it to a DataFrame!
In [10]:
1import pandas as pd2
3df = pd.DataFrame(result1)4df
4. Using Python in a code cell
By default, Python is the language for code cells. In the cell below, we are using a SQLAlchemy connection to execute the same query as the previous example. The result of this query can be converted into a DataFrame in the same manner as above
In [11]:
1result = conn.execute(sa.text('SELECT * FROM users LIMIT 3;'))2
3df = pd.DataFrame(result)4df
5. Using both SQL & Python in a code cell
We can use a single line of SQL within a Python cell using a single %sql call. Below we combine SQL and
Python in the same cell to capture the output in the result variable. We then convert it to a DataFrame
as in previous examples.
In [12]:
1result = %sql SELECT * FROM users LIMIT 3;2
3df = pd.DataFrame(result)4df
6. Preinstalled libraries
By default, a SingleStoreDB notebook has a large number of preinstalled libraries. Run the cell below to see what libraries are already installed!
In [13]:
1!pip list
Our notebooks support libraries available from https://pypi.org/. For example, run the cell below to install the Kaggle open dataset library to install the opendatasets package.
In [14]:
1!pip3 install opendatasets
You can even upgrade versions of a preinstalled library. Run the cell below to get the new version of Plotly.
In [15]:
1!pip3 install plotly --upgrade
7. Magic commands
Magic commands in Jupyter Notebook are special commands that allow you to perform various tasks that are not part of the standard Python language. We have demonstrated two of the included magic commands already: %%sql for submitting entire cells of
SQL code and %sql for submitting a single query in the context of a Python code cell.
There are many other magic commands as well for everything from file system access to debugging your Python code. For information about teh full list of magic commands available, run the code cell below.
In [16]:
1%quickref
Learn more about SingleStoreDB notebooks here and get started with your first notebook!

Details
About this Template
Foundational guide to notebooks with essential tips and tricks.
This Notebook can be run in Shared Tier, Standard and Enterprise deployments.
Tags
License
This Notebook has been released under the Apache 2.0 open source license.
See Notebook in action
Launch this notebook in SingleStore and start executing queries instantly.