
We believe the future of web apps will include an AI conversational interface that not only returns text but also interactive, data-rich widgets. This would lead to truly 1:1 personalized web experiences.
In this article, we will guide you through creating this kind of gen AI app using SingleStore, OpenAI and Next.js. This step-by-step tutorial will help you build and test a micro gen AI app, enabling you to chat with gpt-4o, retrieve random products and render them in custom React components.
We will demonstrate the approach we used to build our gen AI eStore app. This app loads the dashboard in under two seconds by executing five parallel queries that simultaneously read over 100 million rows. It includes a text-to-SQL chat experience over the dashboard data, performs a hybrid (vector + exact keyword match) search to help you find the perfect clothing products for your needs and showcases SingleStore's performance analytics.
Additionally, it performs multiple function calls, all while maintaining efficient and effective performance. The conversational interface also returns agentic widgets that allow users to purchase and rate a product right from the conversational interface.
Let’s get started!
Create database
First, we need to create a database. You can either create a free-for-life Shared Tier database or create a dedicated workspace and get started with some free credits. Once you are logged into the Portal, the newly created database should be ready to use.
If a standard workspace is needed, click on the “+ Group” button in the “Cloud” sidebar section, select a standard workspace variant and fill out the form. When the workspace is ready, create a database and add your IP address to the firewall. To do this go to your workspace, switch to the “Firewall” tab and click on the “Edit” button to open an IP configuration modal. In the opened modal make sure that the “Only allow access from specified IP addresses” option is selected, and click on the “Add My Current IP Address” button.
Create Next.js project
To create a Next.js project, open a terminal window and run the following command:
1npx create-next-app genai-app --typescript --tailwind --eslint
After creating the new project, open it in the code editor and create a .env.local file in the root of the project and assign the following variables:
1# ./.env.local2
3DB_HOST=""4DB_USER=""5DB_PASSWORD=""6DB_NAME=""7OPENAI_API_KEY=""
To get these variable values go to the SingleStore Portal, open your database group and click on the “Connect” button, click on the “Your app” menu item and select the “Node.js” option. Set the environment variables in .env.local.
Install dependencies
Let’s install the SingleStore Elegance SDK to work with the database by running:
1npm i @singlestore/elegance-sdk
Then install the shadcn/ui components by running:
1npx shadcn-ui init
1npx shadcn-ui add button form input card
To manage the global state of the application, we need to install jotai by running:
1npm install jotai
Install the Vercel AI SDK to stream React components to the UI by running:
1npm i ai@3.0.32
Install the OpenAI by running:
1npm i openai
And install the rest of the dependencies by running:
1npm i nanoid react-markdown zod-to-json-schema && npm i -D eslint-config-next 2eslint-config-prettier eslint-plugin-import eslint-plugin-prettier 3prettier-plugin-tailwindcss dotenv-cli
Establish database connection
Once the required dependencies are installed, we can create a database client to work with the database. For this we will use the Elegance SDK that gives you pre-built components and hooks for gen AI and SingleStore CRUD use cases. Create a db.ts file in the ./lib directory with the following code:
1// ./lib/db.ts2
3import { createEleganceServerClient } from "@singlestore/elegance-sdk/server";4
5export const db = createEleganceServerClient("mysql", {6  connection: {7    host: process.env.DB_HOST,8    user: process.env.DB_USER,9    password: process.env.DB_PASSWORD,10    database: process.env.DB_NAME,11    multipleStatements: true,12  },13  ai: {14    openai: {15      apiKey: process.env.OPENAI_API_KEY,16    },17  },18});
The database connection is now ready for use.
Insert data into the database
Our intelligent eStore uses a large dataset with 100M+ rows. However for this app, we prepared a smaller dataset with 2.5k products. Download the dataset form the GitHub repository, and move it to the ./data directory.
Then create a setup-db.ts file in the root directory with the content below. Notice that we are also creating a column called title_v which is a VECTOR type. We will be using this to do a semantic search later.
1// ./setup-db.ts2
3import { readFile } from "fs/promises";4import path from "path";5
6import { db } from "@/lib/db";7
8(async () => {9  try {10    await Promise.all(11      ["chat_messages", "products"].map((tableName) => {12        return db.connection.query(`DROP TABLE IF EXISTS ${tableName}`);13      }),14    );15
16    await Promise.all([17      db.connection.query(`18      CREATE TABLE IF NOT EXISTS products (19        id BIGINT AUTO_INCREMENT PRIMARY KEY,20        created_at DATETIME,21        title TEXT CHARACTER SET utf8mb4 COLLATE utf8mb4_general_ci,22        description TEXT CHARACTER SET utf8mb4 COLLATE utf8mb4_general_ci,23        image VARCHAR(256),24        price DECIMAL(9,2),25        gender VARCHAR(64),26        type_id BIGINT,27        title_v VECTOR(1536),28        description_v VECTOR(1536),29        FULLTEXT KEY(title, description)30      )31    `),32
33      db.connection.query(`34      CREATE TABLE IF NOT EXISTS chat_messages (35          id BIGINT AUTO_INCREMENT PRIMARY KEY,36          created_at BIGINT,37          chat_id BIGINT,38          user_id BIGINT,39          role VARCHAR(64),40          content JSON41      )42    `),43    ]);44
45    const dataPath = path.join(process.cwd(), "data");46    const fileContent = await readFile(path.join(dataPath, "products-1.json"), "utf-8");47    const values = JSON.parse(fileContent);48    await db.controllers.insertMany({ collection: "products", values });49    console.log("Database is ready");50    process.exit(0);51  } catch (error) {52    console.error(error);53    process.exit(1);54  }55})();
and run the following command to create tables and insert the data into the database:
1npx dotenv -e .env.local -- npx tsx setup-db.ts2
Set up OpenAI
To execute a custom SQL query to retrieve the results from the database and provide them as the LLM context to generate the chat completion or render a React component, we need to use the function calling. This is important to note that we are not leaving it up to the LLM to guess how to get the database, but are rather prescriptive by giving it the SQL to get the data accurately. Create a llm.ts file in the ./lib directory and assign the llm variable:
1// ./lib/llm.ts2
3import OpenAI from "openai";4
5export const llm = new OpenAI({ apiKey: process.env.OPENAI_API_KEY });
This LLM will be used to respond to a user request and call a function, the result of which will be rendered on the client.
Create chat
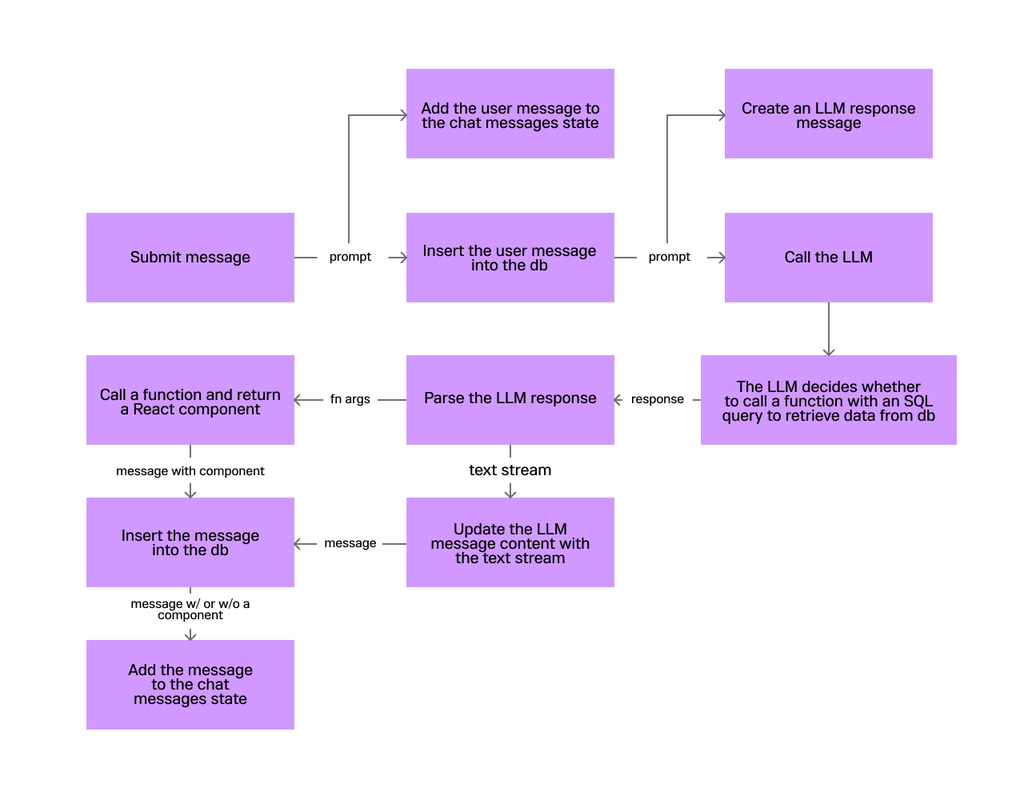
Now we are all set to implement a basic chat experience and random product search (gen AI). To better understand the chat flow, let's take a look at the following diagram:
1// ./types.ts2
3import { StreamableValue } from "ai/rsc";4import { ElementType, ReactNode } from "react";5import { z } from "zod";6
7export type ChatMessage = {8  id: string;9  createdAt: Date;10  role: "user" | "assistant" | "system" | "function";11  content: string | StreamableValue<string>;12  node?: ReactNode;13};14
15export type Product = {16  id: number;17  created_at: string;18  title: string;19  description: string;20  image: string;21  price: number;22  gender: string;23  type_id?: number;24  title_v: string;25  description_v: string;26};27
28export type LLMTool = {29  name: string;30  description: string;31  schema: z.AnyZodObject;32  node: ElementType;33  call: (...args: any[]) => Promise<{ name: string; props: any }>;34};
Create LLM tools
Create a custom map of the LLM tools used in the LLM create chat completion API. Based on these tools and the user's prompt, the LLM understands which function to call. These tools are also used when parsing the LLM response and retrieving chat messages from the database to display the chat history. This is the primary file where a user's prompt and functions are linked based on the tool description and the schema fields.
Create a llm-tools.tsx file in the ./lib directory with the following code:
1// ./lib/llm-tools.tsx2
3import { z } from "zod";4
5import { LLMTool, Product } from "@/types";6import { db } from "@/lib/db";7import { ProductList } from "@/components/product-list";8
9// Map of tools that can be called by the LLM.10export const llmTools: Record<string, LLMTool> = {11  get_random_products: {12    name: "get_random_products",13    description: "Useful when you need to get random products",14    schema: z.object({ limit: z.number().min(1).optional().describe("Number of products 15to get") }),16    node: (props) => (17      <ProductList18        {...props}19        className="px-4"20      />21    ),22    call: async ({ limit = 5 }) => {23      const products = await db.controllers.query<Pick<Product, "id" | "title" | "price" 24| "image">[]>({25        query: `\26          SELECT id, title, price, image FROM products ORDER BY RAND() LIMIT ${limit}27        `,28      });29      return { name: "get_random_products", props: { products } };30    },31  },32};
Create store provider
We need a global store to work with the data on the client side. Create a store-provider.tsx file in the ./components directory with the following content:
1// ./components/store-provider.tsx2
3import { Provider } from "jotai";4import { ReactNode } from "react";5
6import { ChatMessage } from "@/types";7import { db } from "@/lib/db";8import { llmTools } from "@/lib/llm-tools";9import { StoreHydrate } from "@/components/store-hydrate";10
11export async function StoreProdiver({ children }: { children?: ReactNode }) {12  const chatMessageRows = await db.controllers.findMany<13    (Pick<ChatMessage, "id" | "role"> & { created_at: number; content: string })[]14  >({ collection: "chat_messages", extra: "ORDER BY created_at DESC" });15
16  const chatMessages = chatMessageRows.map((message) => {17    let node: ChatMessage["node"] | undefined = undefined;18
19    let content;20    try {21      content = JSON.parse(message.content);22    } catch (error) {23      content = message.content;24    }25
26    const isToolResult = typeof content === "object" && "name" in content && "props" in 27content;28
29    if (isToolResult) {30      const tool = llmTools[content.name];31      if (tool.node) node = <tool.node {...content.props} />;32    }33
34    return {35    <Provider>36      <StoreHydrate chatMessages={chatMessages}>{children}</StoreHydrate>37    </Provider>38  );39}
This component fetches messages from the database, converting them into React components and adding them to the global client state.
To store and display chat messages on the client side, create an atoms directory in the root of the project and create a chat-messages.ts file with the following content:
1// ./atoms/chat-messages.ts2
3import { atom } from "jotai";4
5import { ChatMessage } from "@/types";6
7export const chatMessagesAtom = atom<ChatMessage[]>([]);
To pre-set the chatMessagesAtom value we need to get messages from the database in the server component, and hydrate the atom value. Create a store-hydrate.tsx component that accepts the chatMessages variable and hydrates the atom value in the ./components directory with the following content:
1// ./components/store-hydrate.tsx2
3"use client";4
5import { useHydrateAtoms } from "jotai/utils";6import { chatMessagesAtom } from "@/atoms/chat-messages";7import { ChatMessage } from "@/types";8import { ReactNode } from "react";9
10export function StoreHydrate({11  children,12  chatMessages,13}: {14  children?: ReactNode;15  chatMessages: ChatMessage[];16}) {17  useHydrateAtoms([[chatMessagesAtom, chatMessages]]);18
19  return children;20}
Update the layout component
Update the layout.tsx file in the ./app directory to wrap the children nodes with the StoreProvider to provider the store context:
1// ./app/layout.tsx2
3import { Inter } from "next/font/google";4
5import type { Metadata } from "next";6
7import { StoreProdiver } from "@/components/store-provider";8
9import "./globals.css";10
11const inter = Inter({ subsets: ["latin"] });12
13export const metadata: Metadata = {14  title: "GenAI App Tutorial",15};16
17export default function RootLayout({18  children,19}: Readonly<{20  children: React.ReactNode;21}>) {22  return (23    <html lang="en">24      <body className={inter.className}>25        <StoreProdiver>{children}</StoreProdiver>26      </body>27    </html>28  );29}
Update the page component
In the ./app directory, update the page.tsx file with the following content:
1// ./app/page.tsx2
3import { ChatInput } from "@/components/chat-input";4import { ChatMessageList } from "@/components/chat-message-list";5
6export default function Home() {7  return (8    <main className="flex min-h-screen flex-col items-center justify-between gap-4 p-4">9      <ChatMessageList />10      <ChatInput />11    </main>12  );13}
This page component renders the ChatMessageList component to create a list of messages from the state, and the ChatInput component to submit a prompt.
Create chat message card component
In the ./components directory create a chat-message-card.tsx file with the following content:
1// ./components/chat-message-card.tsx2
3"use client";4
5import { readStreamableValue } from "ai/rsc";6import { useState, useEffect } from "react";7import Markdown from "react-markdown";8
9import { ChatMessage } from "@/types";10import { cn } from "@/lib/utils";11import { Card } from "@/components/ui/card";12
13export function ChatMessageCard({ content, role, createdAt, node }: ChatMessage) {14  const [activeContent, setActiveContent] = useState<string>(typeof content === "string" 15? content : "");16
17  useEffect(() => {18    (async () => {19      if (typeof content === "object") {20        let value = "";21        for await (const token of readStreamableValue(content)) {22          setActiveContent((value += token));23        }24      }25    })();26  }, [content]);27
28  return (29    <Card className={cn("max-w-[75%] py-2", role === "user" ? "ml-auto" : "mr-auto")}>30      <div className="flex items-center justify-between gap-2 px-4">31        <h4 className="font-medium first-letter:uppercase">{role}</h4>32        <time33          className="ml-auto text-right text-xs text-muted-foreground"34          dateTime={createdAt.toLocaleString()}35        >36          {createdAt.toLocaleTimeString("en-US", { hour12: false })}37        </time>38      </div>39
40      {activeContent && (41        <div className="w-full max-w-full px-4 [&_pre]:overflow-auto">42          <Markdown>{activeContent}</Markdown>43        </div>44      )}45
46      {node && <div className="mt-2">{node}</div>}47    </Card>48  );49}
This component gets a message object, parses the message content and renders a chat message card. If the content is a stream, the readStreamableValue is used to read the stream and render the message content.
Create chat message list component
In the ./components directory create a chat-messages-list.tsx file with the following content:
1// ./components/chat-message-list.tsx2
3"use client";4
5import { useAtomValue } from "jotai";6
7import { cn } from "@/lib/utils";8import { ChatMessageCard } from "@/components/chat-message-card";9import { Card } from "@/components/ui/card";10import { chatMessagesAtom } from "@/atoms/chat-messages";11
12export function ChatMessageList() {13  const messages = useAtomValue(chatMessagesAtom);14
15  return (16    <Card className="relative w-full flex-1">17      <div className="absolute left-0 top-0 flex h-full w-full flex-col-reverse 18overflow-y-auto overflow-x-hidden p-4">19        <ul className="relative flex w-full flex-col-reverse">20          {messages.map((message, i, arr) => {21            const isSameRole = message.role === arr[i + 1]?.role;22
23            return (24              <li25                key={message.id}26                className={cn(isSameRole ? "mt-2" : "mt-8", "flex w-full max-w-full27last:mt-0")}28              >29                <ChatMessageCard {...message} />30              </li>31            );32          })}33        </ul>34      </div>35    </Card>36  );37}
This component reads messages from the state using chatMessagesAtom and renders them as a list.
Create chat input component
In the same folder create the chat-input.tsx file to display a form to submit a prompt with the following content:
1// ./components/chat-input.tsx2
3"use client";4
5import { zodResolver } from "@hookform/resolvers/zod";6import { useSetAtom } from "jotai";7import { SendHorizonal } from "lucide-react";8import { nanoid } from "nanoid";9import { useTransition } from "react";10import { SubmitHandler, useForm } from "react-hook-form";11import { z } from "zod";12
13import { ChatMessage } from "@/types";14import { submitChatMessage } from "@/actions/submit-chat-message";15import { Button } from "@/components/ui/button";16import { Card } from "@/components/ui/card";17import { FormField, FormItem, FormControl, Form } from "@/components/ui/form";18import { Input } from "@/components/ui/input";19import { chatMessagesAtom } from "@/atoms/chat-messages";20
21const chatInputFormSchema = z.object({22  content: z.string().min(1).max(1024),23});24
25export type ChatInputFormSchema = z.infer<typeof chatInputFormSchema>;26
27export function ChatInput() {28  const setMessages = useSetAtom(chatMessagesAtom);29  const [isPending, startTransition] = useTransition();30
31  const form = useForm<ChatInputFormSchema>({32    resolver: zodResolver(chatInputFormSchema),33    defaultValues: { content: "" },34  });35
36  const handleSubmit: SubmitHandler<ChatInputFormSchema> = async ({ content }) => {37    try {38      setMessages((i) => [39        { id: nanoid(), role: "user", content, createdAt: new Date() } satisfies 40ChatMessage,41        ...i,42      ]);43
44      const message = await (() => {45        return new Promise<ChatMessage>((resolve) => {46          startTransition(async () => {47            resolve(await submitChatMessage(content));48          });49        });50      })();51
52      setMessages((i) => [message, ...i]);53      form.reset();54    } catch (error) {55      console.error(error);56    }57  };58
59  return (60    <Card className="relative w-full">61      <Form {...form}>62        <form onSubmit={form.handleSubmit(handleSubmit)}>63          <FormField64            control={form.control}65            name="content"66            disabled={isPending}67            render={({ field }) => (68              <FormItem>69                <FormControl>70                  <Input71                    className="pr-12"72                    placeholder="Message"73                    autoFocus74                    {...field}75                  />76                </FormControl>77              </FormItem>78            )}79          />80          <Button81            type="submit"82            className="absolute right-0 top-1/2 -translate-y-1/2 rounded-bl-none 83rounded-tl-none"84            disabled={isPending}85          >86            <SendHorizonal className="w-[1em]" />87          </Button>88        </form>89      </Form>90    </Card>91  );92}
This component displays the prompt and handles the form submission event. After the user has entered the prompt and submitted the form, a new user chat message is created and added to chatMessagesAtom, and the submitChatMessage action is called on the server side to receive a response from the LLM and add the LLM message to chatMessagesAtom.
Create product list component
In the ./components directory create a product-list.tsx file with the following content:
1// ./components/product-list.tsx2
3import { Product } from "@/types";4import { cn } from "@/lib/utils";5import { Card } from "@/components/ui/card";6
7export function ProductList({8  className,9  products,10}: {11  className?: string;12  products: Pick<Product, "id" | "title" | "price" | "image">[];13}) {14  return (15    <ul className={cn("flex gap-4 overflow-x-auto overflow-y-hidden", className)}>16      {products.map((product) => (17        <li18          key={product.id}19          className="flex-1"20        >21          <Card className="w-full overflow-hidden">22            <div className="relative h-0 w-full overflow-hidden border-b pt-[100%]">23              <img24                className="absolute left-0 top-0 h-full w-full object-cover"25                src={product.image}26                alt={product.title}27              />28            </div>29
30            <div className="flex items-center justify-between gap-3 px-4 py-2">31              <h4 className="line-clamp-2 font-medium capitalize">{product.title}</h4>32              <p className="font-medium">${product.price}</p>33            </div>34          </Card>35        </li>36      ))}37    </ul>38  );39}
This component is used in the chatLLMTools map as a node field value. This is part of GenAI, when a user submits a chat input form, the LLM gets the prompt, the tool map and decides if a tool needs to be called. If yes, the a is called and the result of the function call is passed to this component as a props and rendered on the client using the createStreamableUI.
Create a submitChatMessage server action
This app is based on the server actions, providing a new approach for the data fetching. The chat flow requires a submitChatMessage action that gets the user’s prompt, creates text and node streams and calls the LLM to get a text stream response or function calling result.
After receiving the result from the LLM, the createStreamableValue and createStreamableUI functions from the ai/rsc package are used to display the text response or React component on the client. Create a submit-chat-message.tsx file in the ./actions directory with the following content:
1// ./actions/submit-chat-message.tsx2
3"use server";4
5import { createStreamableUI, createStreamableValue } from "ai/rsc";6import { nanoid } from "nanoid";7import { createElement } from "react";8import { zodToJsonSchema } from "zod-to-json-schema";9
10import { ChatMessage } from "@/types";11import { db } from "@/lib/db";12import { llm } from "@/lib/llm";13import { llmTools } from "@/lib/llm-tools";14
15// Helper function to insert a message into the db16function insertChatMessage({ role, content }: Pick<ChatMessage, "role" | "content">) {17  return db.controllers.insertOne({18    collection: "chat_messages",19    value: { role, content: JSON.stringify(content), created_at: new Date().getTime() },20  });21}22
23export async function submitChatMessage(content: string) {24  // The text stream that is used to stream the LLM text response to the client25  const textStream: ReturnType<typeof createStreamableValue<string>> = 26createStreamableValue("");27
28  // The initial LLM response message29  const message: ChatMessage = {30    id: nanoid(),31    role: "assistant",32    content: textStream.value,33    createdAt: new Date(),34  };35
36  // The node steram that is used to stream React nodes to the client37  const nodeStream = createStreamableUI();38
39  (async () => {40    try {41      const [completionStream] = await Promise.all([42        // The create chat completion call with tools that returns a completion steram43        llm.chat.completions.create({44          model: "gpt-4o",45          temperature: 0,46          stream: true,47          messages: [48            { role: "system", content: "You are an assistant" },49            { role: "user", content },50          ],51          // The tools normalization for the llm accepted format52          tools: Object.values(llmTools).map(({ name, description, schema }) => ({53            type: "function",54            function: { name, description, parameters: zodToJsonSchema(schema) },55          })),56        }),57
58        // The user message inserting59        insertChatMessage({ role: "user", content }),60      ]);61
62      // The pasered tool name that should be called63      let completionToolName = "";64      // The pasered tool args that should be provided to a tool call function65      let completionToolArgs = "";66      // The simple text response67      let completionContent = "";68
69      // The completion stream chunking70      for await (const chunk of completionStream) {71        const tool = chunk.choices[0].delta.tool_calls?.[0]?.function;72        const textToken = chunk.choices[0].delta.content || "";73
74        // Assigning tool-related data75        if (tool) {76          if (tool?.name) completionToolName = tool.name;77          if (tool?.arguments) completionToolArgs += tool.arguments;78        }79
80        // Updating the textStream on the new text response81        if (textToken) {82          completionContent += textToken;83          textStream.update(textToken);84        }85      }86
87      await Promise.all([88        // Inserting a message with the completion content into the db89        (async () => {90          if (!completionContent) return;91          return insertChatMessage({92            role: "assistant",93            content: JSON.stringify(completionContent),94          });95        })(),96
97        // Calls the tool provided by the LLM and updates the nodeStream with the new 98React node99        (async () => {100          if (!completionToolName) return;101          const tool = llmTools[completionToolName as keyof typeof llmTools];102          if (!tool) return;103          const args = JSON.parse(completionToolArgs);104          const result = await tool.call(args);105          const node = result.props ? createElement(tool.node, result.props) : undefined;106
107          await Promise.all([108            nodeStream.update(node),109            insertChatMessage({110              role: "function",111              content: JSON.stringify(result),112            }),113          ]);114        })(),115      ]);116    } catch (error) {117      console.error(error);118    }119
120    textStream.done();121    nodeStream.done();122  })();123
124  return { ...message, node: nodeStream.value };125}
1npm run build && npm run start2
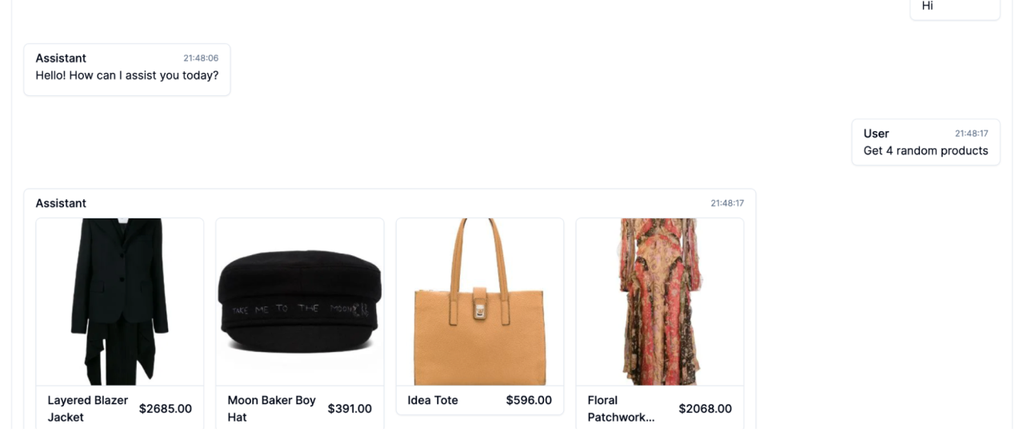
Go to the http://localhost:3000 and try to get N number of random products:
Congratulations! You've successfully built a gen AI app using SingleStore, OpenAI and Next.js. This tutorial guided you through creating a micro gen AI app, enabling chat with gpt-4o, retrieving random products and rendering them in React components.
We also showcased the eStore app, highlighting its efficient handling of over 100 million rows, swift execution of parallel queries and features like text-to-MySQL chat and hybrid search.
We hope this tutorial has empowered you to create and scale your own gen AI applications. Ready to try it out? Start your free SingleStore trial today.

How to build an app with Next.js and SingleStore
Step-by-step guides for setting up your free SingleStore Helios® account, connecting to your database, and running your first queries.


-for-Real-World-Machine-Learning_feature.png?height=187&disable=upscale&auto=webp)