Do you need to get a basic SingleStore application setup quickly using Node.js? Well, this guide’s got you covered.
We will be covering how to use SingleStore and Node.js by setting up a database, connecting to that database using Node.js, and then performing CRUD (create, read, update, delete) operations on that database using Node.js.
First, if you are new to SingleStore, you probably want to know what it is that makes it unique. Well, SingleStore excels at real-time and high throughput query use cases. It is a great general purpose database for running both transactional and analytic workloads. In layperson’s terms, this database is easy to set up, and will scale to match whatever demands you throw at it.
Set up Your Project
Install Node and NPM
Ensure your system has Node.js version 14 or later and a compatible version of NPM (Node Package Manager) installed. For more information on how to check your version of Node and NPM and installation instructions for your system, see downloading and installing Node.js and npm.
Initialize Your Node.js Project
After installing and setting up Node and NPM, it’s time for you to create a brand-new project for our code to live in.
First, you will need to create a directory in your terminal for the project:
mkdir singlestore_node_quickstart
Then, you will navigate to your new directory, so we can start using our project files.
cd singlestore_node_quickstart
Finally, you will need to initialize this project as an NPM project, so we can start saving and using NPM dependencies in our project. This command will set up everything you need to get started.
npm init -y
Add MySQL2 as a Dependency
SingleStore is wire-compatible with MySQL, so you can connect using most other MySQL compatible tools/languages. For this project, we will be using node-mysql2. MySQL2 project is a continuation of MySQL-Native. We’re using it because it makes working with MySQL compatible databases and queries easy.
In order to install mysql2, run the following in your terminal:
npm install --save mysql2
Create a SingleStore Cluster
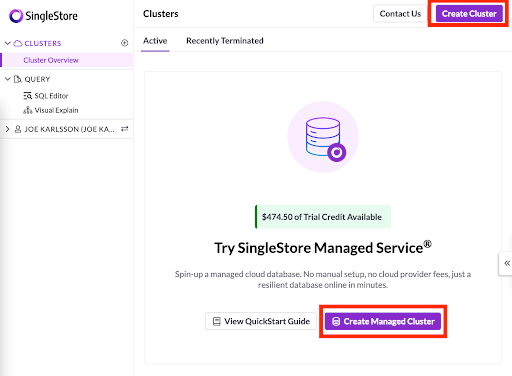
Set up a Free SingleStore Managed Cluster
Sign up to create a free database. This is the easy way to try SingleStore. Get a fully-managed database online in minutes.
Once you’ve signed in, you’ll need to start a new cluster. First, click “Create Managed Cluster” from the SingleStore Portal.
Next, you will be taken to the “Create a Database Cluster” page. You can leave all the default settings and click “next.”
On the “Secure this Database Cluster” page, you will need to set the password and IP Allow list for your application. Be sure to remember the password you put here, since you will need to use it when we connect our Node.js application to our SingleStore Database.
I would also recommend that you leave the IP Allow list to only allow access from your local IP address. It might be tempting to all access from anywhere, but it’s bad practice since you are allowing anyone online access to your data.
Once you have set your password and configured your cluster’s IP access restrictions, you can click “Create Cluster.”
It’ll take a couple of minutes for your cluster to be setup and deployed. So feel free to browse Twitter (or whatever) until it’s ready to go.

Create a Database and Table
Once your cluster has been deployed, you will be able to use the SQL Editor on the left navigation bar of the Portal to set up a new database and table on your new cluster. Once inside the SQL Editor. Copy and paste this command into the editor and press “Run.”
CREATE DATABASE IF NOT EXISTS acme;

USE acme;

CREATE TABLE IF NOT EXISTS messages (
    id BIGINT AUTO_INCREMENT PRIMARY KEY,
    content varchar(300) NOT NULL,
    createdate TIMESTAMP(6) NOT NULL DEFAULT CURRENT_TIMESTAMP
);

INSERT INTO messages (
     content
) VALUES (
     'You have successfully queried from SingleStore!'
);
Connect to your Cluster
Now, go back to your local application files. In your index.js file, you will want to setup the connection to our new SingleStore database using the MySQL2 NPM package. Be sure that you replace the configuration parameters at the top of the code snippet with the correct connection details from your SingleStore deployment.
Note: If you want to connect using SSL, check out this page.
import mysql from 'mysql2/promise';

// TODO: adjust these connection details to match your SingleStore deployment:
const HOST = 'PASTE YOUR SINGLESTORE ADMIN ENDPOINT HERE';
const USER = 'admin';
const PASSWORD = 'PASTE YOUR PASSWORD HERE';
const DATABASE = 'acme';

// main is run at the end
async function main(){let singleStoreConnection;
 try{singleStoreConnection = await mysql.createConnection({host: HOST,
     user: USER,
     password: PASSWORD,
     database: DATABASE} );

   console.log("You have successfully connected to SingleStore.";} catch (err){// Good programmers always handle their errors :)
   console.error('ERROR', err);
   process.exit(1);} finally{if (singleStoreConnection){await singleStoreConnection.end();} } } main();
Test to see that you have successfully connected to your SingleStore database by saving the file, and running the following command in the terminal.
Note: If you encounter any issues or have any questions about developing applications with SingleStore, you can refer to the SingleStore Docs or Community Forums for more information on setup or general help.
node index.js
If you see "You have successfully connected to SingleStore," in your terminal, then congrats! You have successfully connected to your SingleStore data Comment end base.
CRUD Operations
Alright, so now that we have our Node.js code connected to our SingleStore database in the cloud, let’s go ahead and actually do something with our database! We will cover all the basic CRUD operations in the tutorial.
If you want to explore some more advanced operations, be sure to refer to our documentation.
CREATE
Let’s start by writing a function that will be able to create a new entry in our database using the INSERT method.
async function create({conn, content} ){const [results] = await conn.execute(
        'INSERT INTO messages (content) VALUES (?)',
        [content]
    );
    return results.insertId;} ;
Then, within your main() method, let’s call our new create() method.
// CREATE
const id = await create({conn, content: 'Inserted row'} );
console.log(`Inserted row id ${id} `);
Feel free to run it and check your database to check that this new row was created in our acme table.
READ
Reading from our table is possible, with the use of the SELECT method.
async function readOne({conn, id} ){const [rows, fields] = await conn.execute(
        'SELECT id, content, createdate FROM messages WHERE id = ?',
        [id]
    );
    return rows[0];} ;
Drop this method in after the create() method from the previous step in main().
// READ
const msg = await readOne({conn, id} );
    console.log('Read one row:');
    if (msg == null){console.log('not found');} else{console.log(`${msg.id} , ${msg.content} , ${msg.createdate} `);} }
UPDATE
Okay, now let’s update the first entry we added to our database using the UPDATE method.
async function update({conn, id, content} ){await conn.execute(
        'UPDATE messages SET content = ? WHERE id = ?',
        [content, id]
    );}
Drop this in your main() method under the read() method from the previous step.
// UPDATE
await update({conn, id, content: 'Updated row'} );
console.log(`Updated row id ${id} `);

const messages = await readAll({conn} );
console.log('Read all rows:');
messages.forEach(m =>{console.log(`${m.id} , ${m.content} , ${m.createdate} `);} );
DELETE
Alright, we’re cruising now. Just one left, DELETE. We can clean up our little test run by deleting the entry we created in the first step.
async function delete_({conn, id} ){await conn.execute(
        'DELETE FROM messages WHERE id = ?',
        [id]
    );}
And of course, we will need to invoke this method in main().
// DELETE
await delete_({conn, id} );
Summary
And that's it!
You’ve successfully connected your Node.js application to SingleStore and built a CRUD application. Now you can make a blog, an eCommerce store, or a massively fast, real-time analytics platform.
If you want to check out the complete code base, you can do so here.
If you run into any issues or get stuck, make sure to connect with the SingleStore community and get all of your questions answered, or check out more cool developer content on our SingleStore Resources page.
Resources
- [Code] Getting started with SingleStore and Node.js: https://github.com/singlestore-labs/start-with-singlestore-node
- [Docs] Node MySQL2: https://github.com/sidorares/node-mysql2
- [SingleStore Docs] - Connect with Node.js: https://docs.singlestore.com/managed-service/en/developer-resources/connect-with-application-development-tools/connect-with-javascript/connect-with-node-js.html
- [Video] Get started with SingleStore in JavaScript and Node: https://www.youtube.com/watch?v=NvgVx9wmb3k
- [Video] If you want to connect to SingleStore using an ORM (Sequelize) check out this video: https://www.youtube.com/watch?v=koILFN2h7b8
- [Video] If you need to use Stored Procedures With JavaScript and Node.js, check out this video: https://www.youtube.com/watch?v=VLsGoPZeYxA