SingleStore Notebooks
New

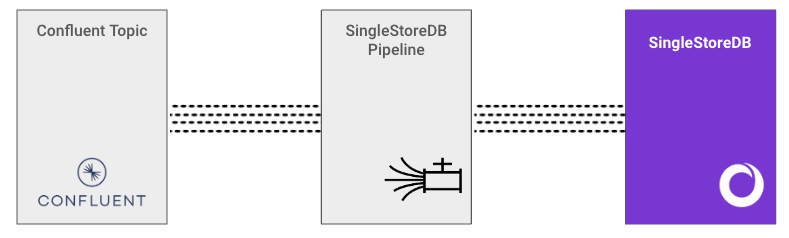

Ingest data from Confluent Cloud (Kafka)
Notebook
Set Up a Kafka Cluster on Confluent Cloud
Before initiating the integration process, it is essential to configure a Kafka cluster on Confluent Cloud. Refer to the Quick Start for Confluent Cloud guide for related information.
Once the cluster is created, perform the following tasks:
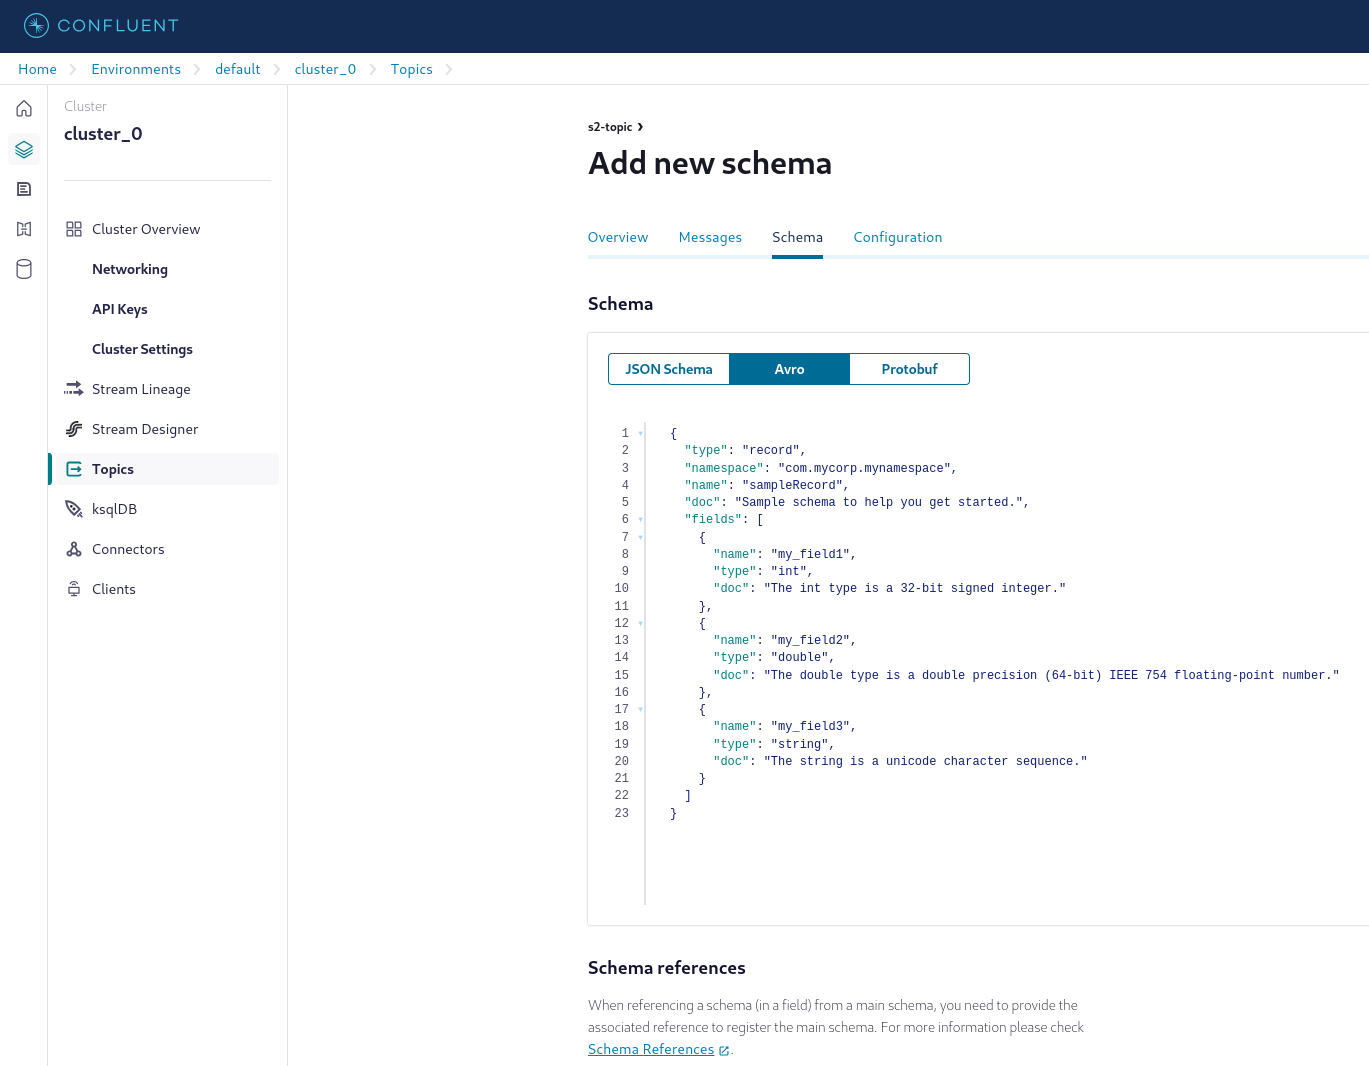
Create a topic, for example 's2-topic'. On the topic overview page, select Schema > Set a schema > Avro, and add a new Avro schema. In this guide, the default schema is used.
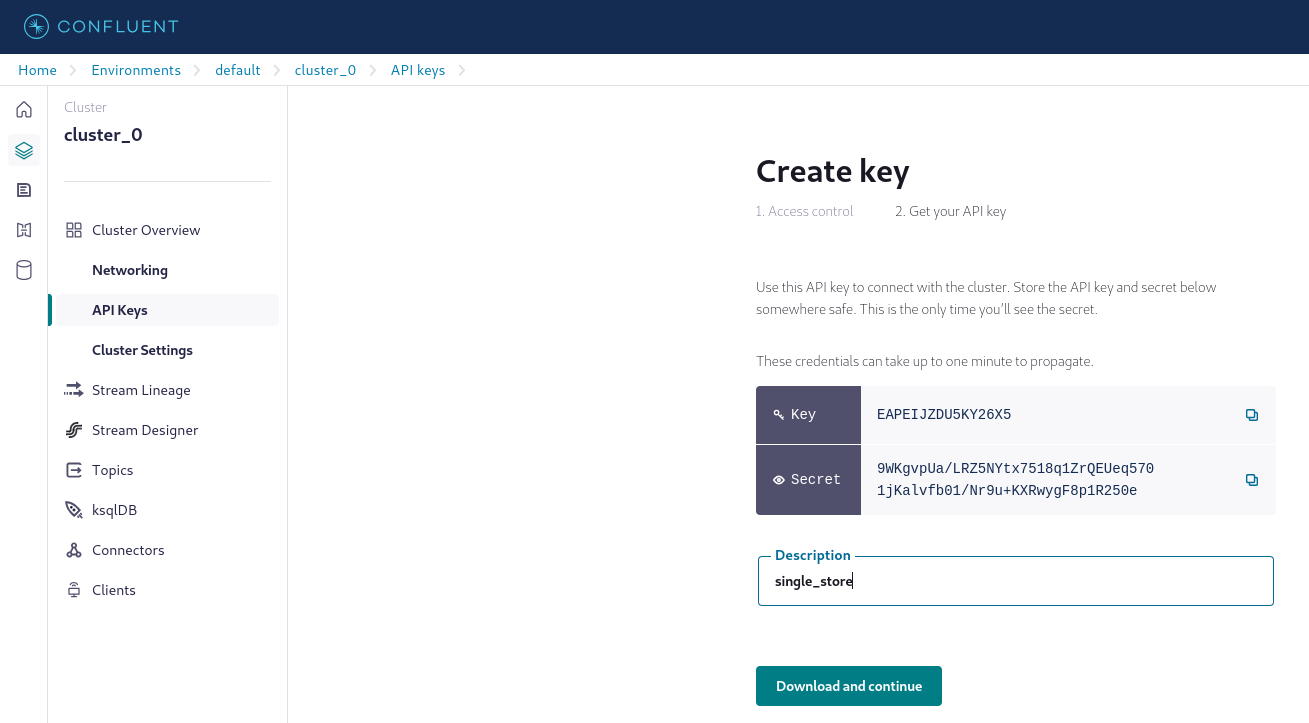
Create API keys. The API key is displayed only once. Be sure to copy and securely store the API key.
On the left navigation pane, select Connectors and create a sample producer named 'datagen' using the Datagen Source connector. In the Topic selection pane, select the 's2-topic' created earlier. In the Kafka credentials pane, select the Use an existing API key option. Configure the producer to use the same schema as the one in the created topic. Refer to Step 3: Create a sample producer for more information.
Launch the 'datagen' producer and verify that the 's2-topic' has new messages.
Set Up Variables
Use the S2_DATABASE_NAME, S2_TABLE_NAME, and S2_PIPELINE_NAME variables for integration.
Copy Data from Confluent Cloud
Assign the topic name 's2-topic' to the CONFLUENT_KAFKA_TOPIC_NAME variable.
Specify the API key and secret using the CONFLUENT_API_KEY and CONFLUENT_API_SECRET variables, respectively.
On the left navigation pane, select Clients. Select a language (for example Java), and configure the following variables:
CONFLUENT_CLUSTER_BOOTSTRAP_SERVER from bootstrap.servers
CONFLUENT_SCHEMA_REGISTRY_URL from schema.registry.url
Select Create Schema Registry API key to create a schema API key and configure the following variables:
CONFLUENT_SCHEMA_REGISTRY_KEY
CONFLUENT_SCHEMA_REGISTRY_SECRET
In [1]:
1S2_DATABASE_NAME = 'confluent_cloud_integration'2S2_TABLE_NAME = 'kafka_events'3S2_PIPELINE_NAME = 'kafka_consumer_pipeline'4CONFLUENT_KAFKA_TOPIC_NAME = 's2-topic'5CONFLUENT_KAFKA_CLIENT_ID = 'cwc|001j000000j7k7bAAA|SingleStore'6CONFLUENT_CLUSTER_BOOTSTRAP_SERVER = 'pkc-xmzwx.europe-central2.gcp.confluent.cloud:9092'7CONFLUENT_API_KEY = 'EAPEIJZDU5KY26X5'8CONFLUENT_API_SECRET = '***************************************'9
10CONFLUENT_SCHEMA_REGISTRY_URL='https://psrc-9zg5y.europe-west3.gcp.confluent.cloud'11CONFLUENT_SCHEMA_REGISTRY_KEY = '7ALNJUEMWMBIMAQL'12CONFLUENT_SCHEMA_REGISTRY_SECRET = '***************************************'
Create a Database
In [2]:
1%%sql2
3DROP DATABASE IF EXISTS {{S2_DATABASE_NAME}};4CREATE DATABASE {{S2_DATABASE_NAME}};
Action Required
Be sure to select the {{S2_DATABASE_NAME}} database from the drop-down list at the top of this notebook. It updates the connection_url which is used by the %%sql magic command and SQLAlchemy to connect to the selected database.
Create a Table Based on the Kafka Avro Schema
In [3]:
1%%sql2
3DROP PIPELINE IF EXISTS {{S2_DATABASE_NAME}}.{{S2_PIPELINE_NAME}};4DROP TABLE IF EXISTS {{S2_DATABASE_NAME}}.{{S2_TABLE_NAME}};5CREATE TABLE IF NOT EXISTS {{S2_DATABASE_NAME}}.{{S2_TABLE_NAME}} (6`field1` int,7`field2` double,8`field3` text9);
Create a Kafka Pipeline
Notes
All Kafka configurations in the pipeline, such as 'client.id', are supported since version 8.1.35.
The schema registry mapping section should be updated according to your schema registry in the 'table column name' <- 'schema registry field name' format.
In [4]:
1%%sql2
3DROP PIPELINE IF EXISTS {{S2_DATABASE_NAME}}.{{S2_PIPELINE_NAME}};4CREATE PIPELINE {{S2_DATABASE_NAME}}.{{S2_PIPELINE_NAME}}5AS LOAD DATA KAFKA '{{CONFLUENT_CLUSTER_BOOTSTRAP_SERVER}}/{{CONFLUENT_KAFKA_TOPIC_NAME}}'6CONFIG '{ \"client.id\": \"{{CONFLUENT_KAFKA_CLIENT_ID}}\",\n         \"sasl.username\": \"{{CONFLUENT_API_KEY}}\",\n         \"sasl.mechanism\": \"PLAIN\",\n         \"security.protocol\": \"SASL_SSL\",\n         \"ssl.ca.location\": \"/etc/pki/ca-trust/extracted/pem/tls-ca-bundle.pem\",\n \"schema.registry.username\": \"{{CONFLUENT_SCHEMA_REGISTRY_KEY}}\"}'7CREDENTIALS '{\"sasl.password\": \"{{CONFLUENT_API_SECRET}}\",\n \"schema.registry.password\": \"{{CONFLUENT_SCHEMA_REGISTRY_SECRET}}\"}'8BATCH_INTERVAL 209DISABLE OFFSETS METADATA GC10INTO TABLE {{S2_TABLE_NAME}}11FORMAT AVRO12SCHEMA REGISTRY '{{CONFLUENT_SCHEMA_REGISTRY_URL}}'13(14field1  <-  my_field1,15field2  <-  my_field2,16field3  <-  my_field317);
Test the Created Pipeline
In [5]:
1%%sql2TEST PIPELINE {{S2_DATABASE_NAME}}.{{S2_PIPELINE_NAME}} LIMIT 1;
Start the Pipeline
In [6]:
1%%sql2
3START PIPELINE {{S2_DATABASE_NAME}}.{{S2_PIPELINE_NAME}};
Stop the Pipeline
In [7]:
1%%sql2
3STOP PIPELINE {{S2_DATABASE_NAME}}.{{S2_PIPELINE_NAME}};
View Consumed Events
In [8]:
1%%sql2
3SELECT * FROM {{S2_DATABASE_NAME}}.{{S2_TABLE_NAME}};
Details
About this Template
A step-by-step guide on seamlessly ingesting data from Confluent Cloud (Kafka) into your SingleStoreDB database using a robust pipeline.
This Notebook can be run in Standard and Enterprise deployments.
Tags
advancedconfluentkafkapipelinerealtime
See Notebook in action
Launch this notebook in SingleStore and start executing queries instantly.
License
This Notebook has been released under the Apache 2.0 open source license.