

Setting the context
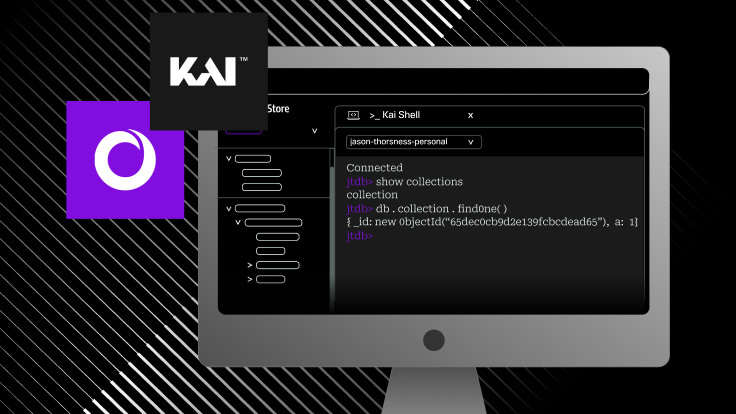
SingleStore Kai™ is an API that allows customers to interact with SingleStore using the MongoDB® query language, as well as its ecosystem's drivers and tools.
However, when this API was introduced, there was really no way to showcase its capability from within the SingleStore Cloud Portal. So, we set off to build a shell-like UI that our customers could use to quickly play with SingleStore Kai.
Still at this time, we were not sure what to build — as there were so many different paths we could take to reach our goal. To better understand the direction to take, we had to look more deeply into several variables including:
- What are Mongo developers used to?
- Could we reuse something we already have in our Portal UI?
- What would take the least amount of effort/time to build? Or, what would have the right ROI?
We considered three possibilities:
Jupyter Notebooks
➕ Jupyter Notebooks is a web-based interactive computer platform that basically allows running code in a pre-built environment in a seamless way. It’s also a tool that is very well-known throughout the software engineering and data science communities, and that could really facilitate using a tool like mongosh directly on the Portal.
➕ Another big plus for Notebooks is that they're already natively integrated into the SingleStore Customer Portal, further lowering the development effort bar!
➖ However, Notebooks have a downside which is that they require a running server, so they can't be served for free (unless we were to use JupyterLite, but that has a lot of limitations as well).
Mongo Query Editor UI
➕ A Mongo Query Editor UI was something we thought of because we already have something very similar in place for running regular SQL queries, SQL Editor. This is basically an open-text playground that allows people to run whatever text they have highlighted as a SQL query. Because we already have most of this infrastructure built, the effort to build a similar experience would be somewhat low.
➕ Another pro is this UI can run entirely on the browser (more on that later), saving us from all the potential server costs since the computing happens in the clients’ browser.
➖ Unfortunately, this kind of “playground experience” isn’t something that Mongo developers are used to — or see as a good user experience for running MongoDB queries — as they are more used to running queries directly from a shell.
Web terminal/shell
➕ Web terminals/shells are gaining a lot of traction these days and that could serve our UX purposes, since terminals are exactly what Mongo devs are used to. The only main difference is they are served in the browser.
➕ Since this would be served in the browser, we can remove server costs from the equation.
➕ mongosh CLI already has an OS’s client-side implementation that we could use for our own purposes.
➖ There aren’t any good React-compatible components that we could use for providing a terminal-like experience in the browser. As such, building or extending a good UI for this could possibly take quite a bit of time and effort.
The decision
After looking very carefully at all the pros and cons, we decided that building a web terminal would be our best shot at delivering something fast, innovative and most importantly that could provide the best experience for our users:
- Fast to build.
mongoshalready has an OS lib that could run on the client. - Best UX. Our customers can rely on the tools they are used to, without leaving the Portal.
- Innovative. We have the chance to build this entire experience on top of the browser (no servers at all), from the query parsing to the database connection. This is possibly something that no other cloud database product has ever built, and that can save costs while maintaining a great user experience.
Client-side architecture
At this point, we have already assembled all the pieces that we need to build our Kai Shell project:
- Driver that allows us to connect to a MongoDB database
- CLI interface/API that allows us to use
mongoshsyntax - Terminal UI
However, there isn’t an OS driver that allows connecting to a MongoDB database directly from the browser, without any servers in the middle. To connect to a database, we need to establish a TCP connection — which is not possible from a browser due to multiple security concerns.
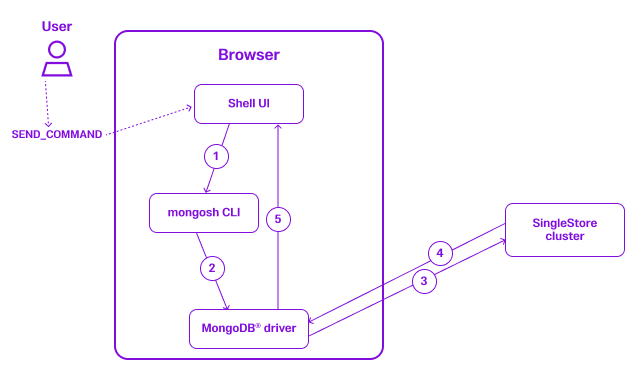
Connecting to a database through the browser
Code running inside a browser is limited in terms of the types of network requests it can make. Unlike a regular Python or C script running on a laptop, JavaScript code running inside of a browser can't instantiate arbitrary TCP connections. In fact, these are the only type of requests allowed:
- HTTP requests (HTTP is a very narrow and specific protocol built on top of TCP)
- WebSocket connections, which are just HTTP connections that have been "upgraded" to a WebSocket for simultaneous two-way communication
So, those are our options when it comes to connecting to a database from the browser. Without modifying the database too much and having it expose an HTTP API, the easiest way to do this is by having a WebSocket proxy that runs alongside or inside the database process which the browser can interact with. This proxy has to accept regular database protocol packets on one end (in the case of SingleStore, that means either MySQL or MongoDB® protocol). Then, browser code can simply use a slightly modified JavaScript MySQL or MongoDB driver to talk to the database. The most popular libraries are MySQL2.js and node-mongodb, respectively.
Notice, however, that SingleStore actually also has an HTTP API — but only for data, not all commands.
You may be wondering: what slight modifications do these drivers need? Well, both of these drivers were designed for Node.js, where it is possible to send regular TCP requests with MySQL or MongoDB protocol packets inside of them. However in the browser, we have to send these packets through a WebSocket connection. To that end, we adapted MySQL.js to send the protocol packets it generates via a WebSocket connection:
1import { Buffer } from "buffer";2import EventEmitter from "eventemitter3";3
4export default class WebsocketWrapper extends EventEmitter {5  _ws: WebSocket;6  _opened: boolean;7  _readQueue: Array<Buffer>;8
9  constructor(host: string, port: number, endpoint: string, ssl: boolean) {10    super();11    this._opened = false;12    this._readQueue = [];13
14    let proto = "ws";15    if (ssl) {16      proto = "wss";17    }18
19    this._ws = new WebSocket(`${proto}://${host}:${port}${endpoint}`);20    this._ws.binaryType = "arraybuffer";21
22    this._ws.onopen = this._handleOpen;23    this._ws.onmessage = this._handleMessage;24    this._ws.onerror = this._handleError;25    this._ws.onclose = this._handleClose;26  }27
28  _handleOpen = (evt: Event) => {29    this.emit("open", evt);30    this._opened = true;31    this._flushQueue();32  };33
34  _flushQueue = () => {35    if (this._opened) {36      while (this._readQueue.length > 0) {37        this.emit("data", this._readQueue.shift());38      }39    }40  };41
42  _handleMessage = (evt: MessageEvent) => {43    if (!(evt.data instanceof ArrayBuffer)) {44      throw new Error("Expected to receive ArrayBuffer from websocket");45    }46
47    if (!this._opened || this._readQueue.length > 0) {48      this._readQueue.push(Buffer.from(evt.data));49      this._flushQueue();50    } else {51      this.emit("data", Buffer.from(evt.data));52    }53  };54
55  _handleError = (evt: Event) => this.emit("error", evt);56  _handleClose = (evt: CloseEvent) => this.emit("end", evt);57
58  write = (data: Uint8Array) => this._ws.send(data);59  destroy = () => this._ws.close();60  end = () => this._ws.close();61
62  // Not Implemented63  pause = () => {};64  resume = () => {};65}
This wrapper, which implements many of the same functions that Node.js's net.Socket also implements (write, destroy, end, pause, resume), allows us to "swap out" the TCP socket that MySQL.js uses with this one. So, we have a very thin fork of MySQL.js that can talk to a SingleStore database from a browser.
Of course, we did a very similar thing for node-mongodb.js.
Using mongosh CLI in the browser
mongosh is the official MongoDB CLI tool that developers use to interact with MongoDB. It provides an interactive JavaScript shell environment where users can execute MongoDB commands, queries and JavaScript expressions. Due to its popularity within the MongoDB community, we decided to incorporate it within our Portal, as the way to interact with SingleStore Kai (by relying on the mongosh API).
Luckily for us, the MongoDB team had already published an open source version of “mongosh” that we could use inside Portal (that runs natively on the browser): https://github.com/mongodb-js/mongosh. Now, it is very important to understand how this package works almost as if it was our own code, since it would become the core pillar of a major Portal feature. This has two main parts to it:
- How is the code being executed?
- How secure is it to interact with SingleStore Kai in the browser?
Fortunately for us, MongoDB has a great blog post where they go through the ins and outs of how they made it so that people can use the mongosh query API directly on the browser. With that information in mind, plus some codebase exploration, we could already come up with good enough answers for our initial questions and integrate this package with Portal.
1. How is the code being executed in the browser?
mongosh relies directly on the browser to execute any arbitrary code, and that is done by leveraging the eval JS function. This is a function that takes code in string format and executes it.
1const code = "console.log(1+1)";2eval(code); // prints 2
But that means the browser must somehow have the context of mongosh-related objects/functions that get evaluated (so that running mongosh-compatible code works). The way mongosh does this is by injecting all the methods and utilities in the window global object, which is then passed down as context to the eval function:
1const context = { a: 1 };2
3// prints '{a: 1}'4eval("(function(){console.log(this)})").call(context);
The architectural decision of relying on the browser runtime to execute the code was extremely smart and much less error-prone than running a custom AST parser. This makes the shell much more powerful and versatile, since we can rely not only on all the mongosh commands but also on all the browser’s JavaScript features — making it easier to accomplish a bigger variety of tasks:
1// inserts 10 items to the collection2for (let i = 0; i < 10; i++) {3 db.collection.insertOne({ a: i });4}
2. How secure is it to interact with SingleStore Kai on the browser?
Using eval for executing the user’s input is seen as “opening a door” for possible attackers and malicious activities against its origin or even its origin’s customers. However, the mongosh browser’s shell had already taken this into account, making sure that the security risks were minimized as much as possible.
This was done by creating and injecting a sandboxed iframe into the document and using that iframe’s context to evaluate the code. This alone already provides a lot of security features like blocking page directs, form submissions and others. On top of that, we were also very careful in not evaluating any code that comes from external sources, like the URL or from the database.
1// setup a sandboxed iframe2this.container.insertAdjacentHTML(3 "beforeend",4 '<iframe src="about:blank" style="display: none" sandbox="allow-same-origin" />',5);6const iframe = this.container.firstElementChild as HTMLIFrameElement;
Mongosh integration into SingleStore Cloud Portal
Restrictive open-source licenses
Unfortunately using this library in our Portal UI wasn’t as straightforward as using any other open source libraries out there, as it relies on some packages that have peerDependencies with packages whose licenses are a bit more restrictive.
To work around these issues, we decided to fork some parts of mongosh and fill in the packages we couldn’t use with our own implementations, as these were mostly UI-related packages.
Shaping mongosh to our needs
The mongosh package exposes a whole lot of features we ended up not using like “auto-completion.” To make it more suitable for our use case, we made small abstractions on top of mongosh, thus, creating a unified way to consume this package within our Portal.
1let instance: Nullable<IframeRuntime> = null;2export const mongoShellRuntime = {3 initRuntime: async (4 serviceProvider: ServiceProvider,5 ): Promise<OpenContextRuntime> => {6 instance = new IframeRuntime(serviceProvider);7 return instance.initialize();8 },9 evaluate: async (code: string): Promise<RuntimeEvaluationResult> => {10 if (!instance) {11 throw new Error("Runtime not initialized");12 }13 return instance.evaluate(code);14 },15 getConnectedDBName: (): string => {16 return instance?.openContextRuntime?.instanceState.currentDb._name;17 },18};
Integrating mongosh with the MongoDB driver
To initialize mongosh we need to set up a few things:
- A MongoDB client to interact with the database
- Connect to the client
- Initialize the
mongoshruntime to inject the context and prepare a tunnel to communicate with the MongoDB client
1// 1 - setup MongoDB client2const client = new MongoClient(mongoWsEndpoint, {3  auth: {4    username: username,5    password: password,6  },7});8
9// 2 - connect to the client10client.connect();11
12// 3 - initialize the connection13client.connect().then(() => {14  const bus = new EventEmitter();15  mongoShellRuntime16    .initRuntime(new CliServiceProvider(client, bus))17    .then(() => {18      console.log("success");19    })20    .catch((err) => {21      console.error(err);22    });23});
After all that setup, it should be as easy as calling the evaluate function!
1const response = mongoShellRuntime.evaluate(command).then(async (result) => {2 return result;3});
Building the terminal UI
Now that we already had the infrastructure set to handle communication between a browser and a cluster with SingleStore Kai enabled, we just needed to introduce the final piece of the puzzle — a terminal UI that the user could use to send and receive mongosh commands.
Just like any other feature, we wanted to ship it as fast as possible without compromising on quality, and that usually means using open source code. After looking into a lot of alternatives to serve as the base for our terminal UI, we ended up with these:
| Hyper.js | CodeMirror | React Terminal | |
|---|---|---|---|
| PROS ✅ |
|
|
|
| CONS ❌ |
|
|
|
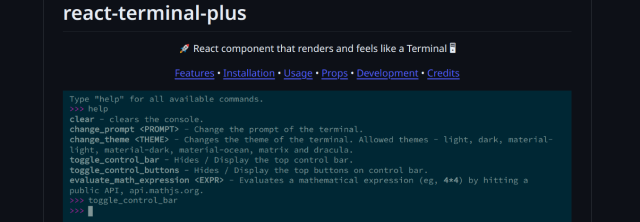
After exploring the pros and cons of these packages, we ended up going with the one that could ultimately give us the best base to build upon: react-terminal.
Necessary features
Despite react-terminal having a lot of features that make it feel and look like a native terminal, it still missed some essential ones that we wanted the Kai Shell to have, including:
- Copy/paste capabilities with both shortcuts, and through the browser’s context menu
- Cancel and clear shortcuts
- Command history with local storage support
Building on top of react-terminal
For us to build those features — plus a few minor ones quickly — it would be very hard to rely on the open-source community behind this package. Thus, we decided to take the more unconventional path and fork this project to use it as our base to Kai’s Shell UI.
As part of the efforts to make this project a good base for us, we saw the need to do a small refactor before starting to implement new features:
- Add better type safety for all the lib’s entry points
- Rely on a Flux-based pattern to control the states of the UI
- Setup Cypress Component Tests
- Change internal tooling
These changes give us a mature base that we can reliably work on top of.
1. Add better type safety for all the lib’s entry points
In today’s web-related packages, having a good TypeScript contract is seen as a must — and a lot of times, the reason why people will use package X instead of package Y. This was a pretty easy improvement with an extremely high impact.
1export type TerminalProps<ThemesT extends string> = {2 enableInput?: boolean;3 caret?: boolean;4 showControlBar?: boolean;5 showControlButtons?: boolean;6 controlButtonLabels?: string[];7 prompt?: string;8 commands?: Record<string, TerminalMessage>;9 welcomeMessage?: TerminalMessage;10 errorMessage?: TerminalMessage;11 rounded?: boolean;12 themes?: Record<ThemesT, ThemeSchema>;13 theme?: NoInfer<ThemesT> | DefaultThemes;14 defaultHandler?: (15 command: string,16 commandArguments: string,17 ) => TerminalMessage | Promise<TerminalMessage>;18};
2. Rely on a Flux-based pattern to control the states of the UI
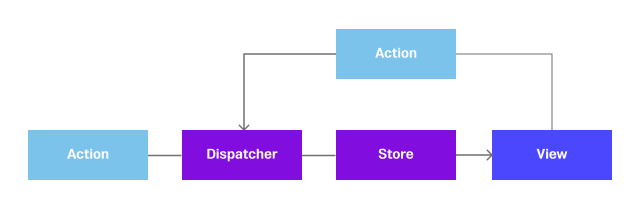
The original react-terminal initially relied on a conventional mix of useState, context and useEffect to control the Terminal's UI state. However, as a React application grows in complexity, the limitations of using useState as the main method for state management become apparent. It becomes increasingly challenging to seamlessly integrate new features and accurately anticipate state changes. Making it the perfect scenario to use a much more predictable and centralized state management pattern, like the Flux pattern.
This pattern allows us to control the whole terminal through a single source of truth (the store), by dispatching events directly through the UI. It makes it much easier to know what the next UI state will be, depending on the dispatched event. It also makes it easier to add new features without adding a whole new layer of complexity.
1// reducer2switch (action.type) {3  case "CLEAR": {4    // ...5  }6  case "CANCEL": {7    // ...8  }9  case "SUBMIT": {10    // ...11  }12  case "TYPE": {13    // ...14  }15}16
17// UI dispatch18<button onclick={() => dispatch("clear")}>Clear</button>;19
3. Setup Cypress Component Tests
Fortunately for us, the original project already had a good test integration coverage, which in my opinion is the most important one to have in UI projects. However, this was done with Jest and React Testing Library, which works relatively well but is harder to debug, and it’s not a stack we are used to at SingleStore.
As such, we decided to refactor the existing tests to use a stack we were more familiar with: Cypress Component Testing. Jest's main advantage is that it relies on JSDom for running the tests, while Cypress relies on a “real” browser and gives us UI debugging and time travel capabilities.
1// example of a CCT test case2it("clear command clears the console", () => {3  cy.mount(4    <TerminalContextProvider>5      <ReactTerminal />6    </TerminalContextProvider>,7  );8
9  writeInTerminal("invalid_command");10  writeInTerminal("Enter");11  cy.findByText("not found!");12  writeInTerminal("clear");13  writeInTerminal("Enter");14  cy.findByText(">>>", { exact: true });15});
4. Change the internal tooling
Internal tooling is often underestimated, but when leveraged correctly, it gives developers an enormous boost in productivity. Some of the things we changed as soon as we decided to fork the project were:
- Use pnpm instead of Yearn for managing packages and dependencies
- Update all the main dependencies
- Using Prettier for formatting instead of relying on
eslint
Altogether, these changes provide a much faster feedback loop and allow us to develop on top of tools that we were already familiar with.
Introducing react-terminal-plus
Once we were satisfied with all the features we incorporated into this package, we decided to publish it into the public npm registry and make it fully open source, as a more complete version of react-terminal: react-terminal-plus. This is a repository that you can contribute to, just like you would for any other open source project. And for us at SingleStore, it was extremely important to give back to the community — even more when this is a fork of another open source project.
Final result
After around six months of research and development work, we put all the pieces together and incorporated Kai Shell into SingleStore’s Portal:
- A way to connect and interact with a cluster with Kai Support: MongoDB Node driver
- CLI language that Mongo developers are used to:
mongosh - A browser shell:
react-terminal-plus
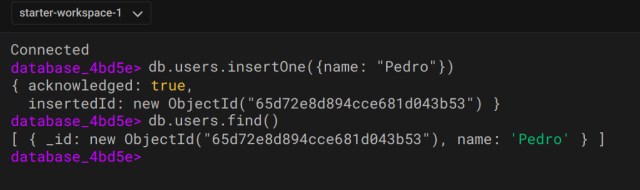
As of today, this is the fastest way to try SingleStore’s Kai capabilities, and it is also very likely that it ranks as one of the quickest methods to interact with a fresh deployment when compared with all the other cloud databases out there. All it takes are a couple of clicks to get to the Kai Shell UI and you can just start typing away mongosh commands in a terminal — without the need to leave the Portal or set any credentials.
Conclusion
The Kai Shell feature introduction was a big success!
Product wise, we were able to deliver an almost fully featured shell in the browser where our customers can interact with the Kai API in a super faster manner, without ever leaving the portal or needing to do extra configuration. On top of that, we are potentially saving a lot of costs by having the computing done on the client side.
From an engineering standpoint, this project drove a big innovation wave, as we ended up setting up a lot of custom parts and more importantly, “invented” a way for the client’s machine to be responsible for connecting and querying the database directly without passing through any other layers. This is possibly something that no other cloud database has implemented in their products.
Finally, with great effort and teamwork from SingleStore’s engineering team, we were able to build and deliver something that we think our customers would benefit from and more importantly, something that they would genuinely enjoy using: Kai Shell.


