You can run Singlestore Helios, with $600 of FREE credits. We tell you how in this blog post. The combination of free access, and not needing to worry about infrastructure maintenance, can be extremely convenient for demos, software testing, developer productivity, brief proof of concept (PoC) tests, and brief tests of production workloads.
Many Ways to Run SingleStore for Free
Because there are significant costs to SingleStore, free trials of Singlestore Helios are limited to 48 hours of time – two full days. You can also download and run SingleStoreDB Self-Managed for free, in the cloud (you pay the cloud costs), or on your own services, without a time limit. The only restriction is a limit to four nodes (servers or server instances) with up to 32GB RAM, which is enough for many of our customers to do a great deal of meaningful work.
And, if you wish to try running SingleStore for free on your laptop, rather than across multiple servers, you can easily do that too. We’ve developed instructions for running SingleStore for free on Docker Desktop (recommended if you don’t have specialized knowledge of the other methods listed here); on Kubernetes (which is great if you know, or want to use, Kubernetes); directly on Linux; or on Vagrant.
You should run your cluster on Singlestore Helios for the greatest ease of use and management if you’re sure that you will want to use Singlestore Helios, or if you want to compare the fully managed Singlestore Helios to SingleStoreDB Self-Managed that you manage yourself, whether in the cloud of on-premises.
In this post you’ll quickly build a 4-node SingleStore cluster running on Singlestore Helios, the managed, infinite scale database in the cloud, for free. There is no hardware to provision, no software to install, no fuss, no mess.
The steps here are: get a free SingleStore license; login to the cloud portal; create the Singlestore Helios cluster; and browse to SingleStore Studio. You’ll have a solid 4-node, distributed, partitioned cluster running in the cloud in about ten minutes.
Why Move to the Cloud?
In traditional database projects, you first need to acquire hardware, then provision the hardware by installing the operating system, install the SingleStore software, and finally provision the database. In the event of hardware failure, you need to diagnose the failure, contain the failing parts, and replace or reconfigure to compensate for failure.
When running in the cloud, all this infrastructure management is outsourced to SingleStore’s managed cloud platform. The only things you’ll need to specify are the size of our cluster and which public cloud you’d like to use.
In non-trial configurations, the cost of Singlestore Helios includes both the software and hardware. Compare this to the cost of your legacy database and the cloud or on-prem machines you’ll need to manage. Singlestore Helios contains the costs, offering a single, easy-to-read bill that covers all your data storage and processing needs. And customers tell us that the cost of Singlestore Helios, which includes the cloud provider costs, is almost identical to the cost of an Enterprise license for SingleStoreDB Self-Managed, plus the cloud costs to run it. The only difference is that, with Singlestore Helios, the service is managed by SingleStore, rather than by you. You save the time, effort, and cost of managing your cluster. Your database management tasks and support requirements from SingleStore are simplified.
With Singlestore Helios, once you know how SingleStore works, you can take these experiments and quickly scale up to assess SingleStore against your service-level agreements (SLAs) and your need for high availability needs. That’s when you can really open up the throttle, learn how your data performs on SingleStore, and dial in system performance for your production workloads.
| Cluster-in-a-Box | Multi-Node Cluster | |
|---|---|---|
| Hardware | 💻 Laptop computer | 🖥️🖥️🖥️🖥️ Many hefty machines |
| Best use case | - Try out SingleStore - Test SingleStore capabilities - Prototyping | - Proof of concept (PoC) - Production workloads - High availability - Performance testing |
| Cost | Free, up to four nodes with 32GB RAM each | Free, up to four nodes with 32GB RAM each |
| Support | Community support | Community support |
Sign Up For SingleStore
To get a free license for SingleStore, register at https://www.singlestore.com/cloud-trial/ and click the link in the confirmation email. Then go to the SingleStore customer portal at
and login. On the Licenses page, you also see the free-tier license. This license never expires, and is good for clusters up to four machines and 128GB of combined RAM. This is not the license you’ll want for a production cluster, but it’s great for these “kick the tires” scenarios. You could use this license key to spin up a single-node cluster-in-a-box in Docker Desktop, on Kubernetes, or on a Linux VM. You could also use this to spin up a 4-node cluster with up to 32-gigs ram on a Linux VM, in containers, or using the Kubernetes operator.
Spin Up a Cluster
Spinning up a cloud-native trial database is easy. You’ll log in to the portal, click through a few dialogs, and in no time you’ll have a cluster of machines working to store and serve our data quickly.
- Signup for an account
- Click Clusters on the far left.
- Click Create a Managed Cluster.
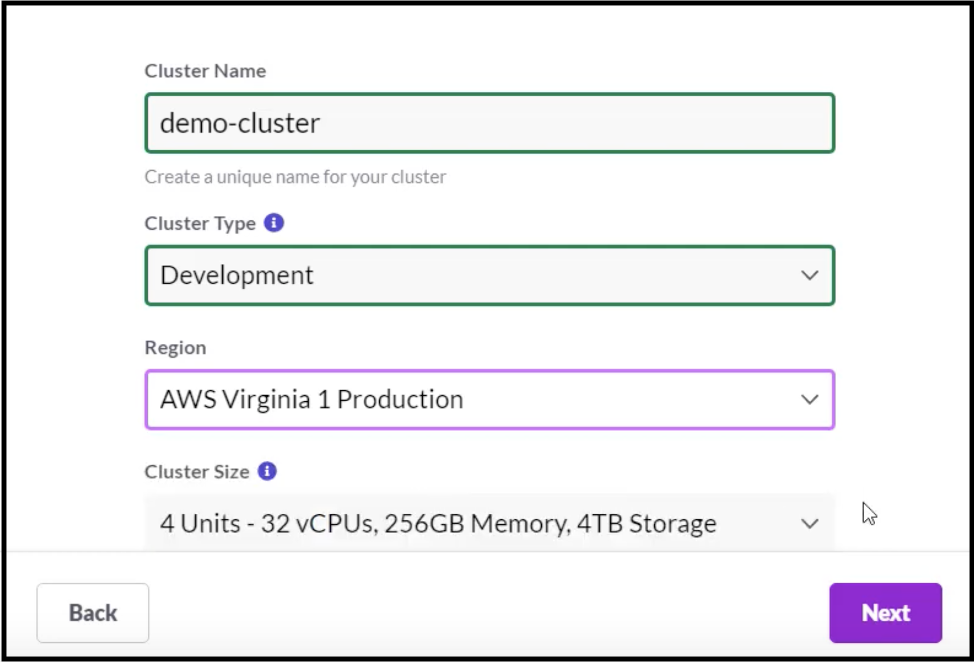
- Set the cluster’s name.

- Choose the cluster’s environment. This is merely a description and doesn’t affect the responsiveness or availability of the cluster.
- Choose the Cloud Provider and Region. Don’t see the region you want yet? Contact us, and let us know.
- The Cluster Size only gives you a single option. In non-trial environments, you could scale up, but like SingleStore’s free tier, in the Singlestore Helios trial, you’re limited to 4 nodes.
- Click “Next.”

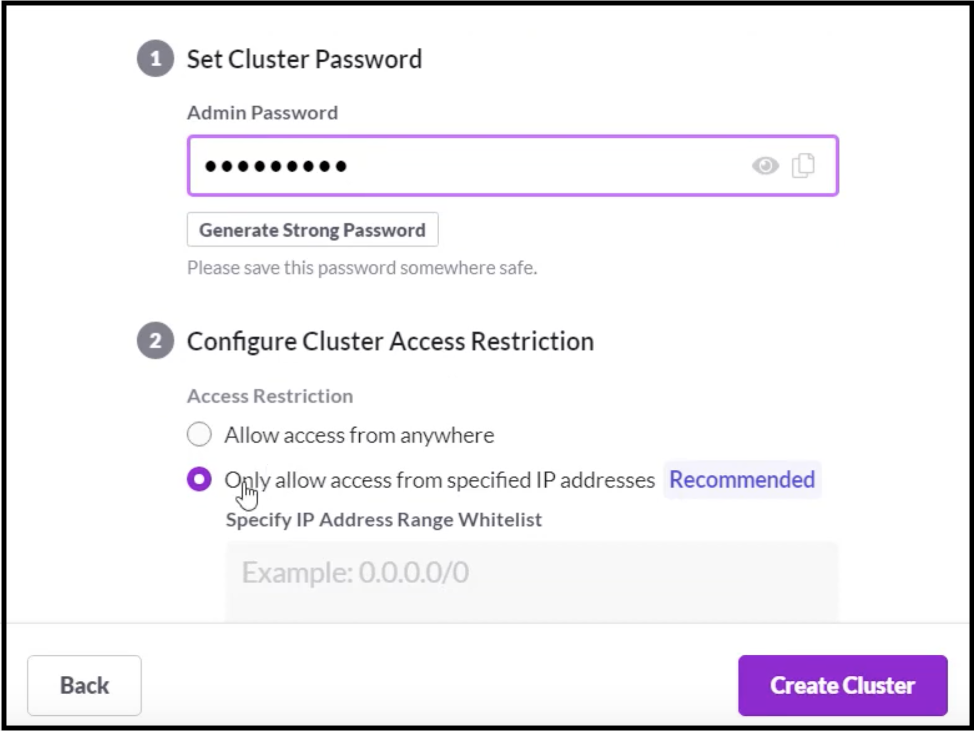
- Set the database admin password. This is the password you’ll use as you connect applications and dashboards to the data store.
- Set database access restrictions. Best practice is to limit the database to a few key IP addresses, so there’s no more attack surface than necessary. Click “Add My Current IP Address.”
- Click “Create Cluster.”
With that, the cluster is provisioned. Within a few minutes, it’ll be ready to use. There was no software to install, no hardware to provision, no fuss, no mess.
Start SingleStore Studio
As soon as the cluster says it’s ready, let’s dive in. SingleStore Studio is the browser-based SQL editor and database administration tool. You get SingleStore Studio access for free as part of any Singlestore Helios cluster.
- Signup for an account.
- Click Clusters on the far left.
- Scroll down through the information page. Note that the username is “admin.”
- Two IP addresses are listed for the cluster. The first is the Admin connection for changing schema. The second is for querying and altering data.
- Click on “Open SingleStore Studio.”
- Login to the cluster using the username “admin” and the password you entered when creating the cluster.
Down the left side we see all the available tools in SingleStore Studio including the SQL Editor, the list of databases, and the Query Profiler.
On the main page, we see 7 healthy nodes. Wait a minute – we provisioned a four-node cluster. How did we get seven nodes? Click on the nodes tab on the left, and you’ll see the nodes in your cluster. You will have one master aggregator, two other aggregators, and four leaf nodes. Data is stored in partitions on the leaf nodes. Users and applications connect to any aggregator node and issue queries. The aggregator splits the query into pieces for each leaf and collects, assembles, and sorts the results into a deterministic result set.
So you paid for four nodes, and you got seven nodes. You see that you only pay for the nodes that are storing your data. Excellent!
Click on the SQL Editor page, and you see the query window. In the query window, type each command, select the line, then push the execute button on the top-right.
Loading gist, please wait...
For more details on SingleStore Studio, check out the docs or watch the SingleStore Studio tour video.
Note. There are some SingleStore Studio features that don’t make sense in a managed cloud scenario, so they’re absent when Studio is used with Singlestore Helios. This is only because those features apply to aspects of SingleStore that are managed for you in Singlestore Helios, but that you have to manage yourself (with the help of SingleStore Studio) in SingleStoreDB Self-Managed, whether you run it in the cloud or on-premises. This makes your work simpler.
Where Can You Go From Here?
SingleStore is now ready for all the “kick the tires” tasks you need. You could:
- Hook up your analytics dashboard to SingleStore, connecting to the cloud’s IP on port 3306.
- Start your application and connect it to SingleStore using any MySQL connector. (SingleStore has native support for the MySQL wire protocol, easing connectivity.)
- Create an ingest pipeline from Kafka, S3, or other data source.
Being able to run these tasks from such a simple cloud-native setup is a real time-saver. It’s simple to scale this trial up to accomodate large data workloads. But whether it’s a Singlestore Helios trial, a Singlestore Helios dev cluster, or a Singlestore Helios production cluster, you get the same always-on, cloud-native experience.
Cleanup
You’ve finished your experiment today. To stop the database:
- Login to the customer portal.
- Click Clusters on the far left.
- Choose your cluster and click “Delete Cluster”.
This will delete the cluster and all the data stored in it. When you’re ready for your next experiment, come here and create a new trial database.
Conclusion
With Singlestore Helios, you can spin up a fully distributed, cloud-native SQL database in minutes. There was no software to install, and no hardware to provision. You saw how easy it is to spin up a cluster, connect to it with SingleStore Studio, and start being productive. You can try SingleStore for free today, using Singlestore Helios or SingleStoreDB Self-Managed, or contact us for a personalized demo. Now go build great things!


