
In this article, we will look at how to use SingleStoreDB to store and query the OpenAI Wikipedia vector database dataset.
SingleStoreDB has supported a range of vector functions for some time, and these functions are ideally suited for storing embeddings, doing semantic search and using the data to provide context to OpenAI as part of the prompt. With this mechanism, we will be able to add “short-term” memory to ChatGPT.
The notebook file used in this article is available on GitHub.
In several previous articles, we have used some of the vector capabilities built into SingleStoreDB:
- Quick Tip: SingleStoreDB’s EUCLIDEAN_DISTANCE and JSON_ARRAY_PACK Functions
- Using SingleStore, Spark and Alternating Least Squares (ALS) to Build a Movie Recommender System
In this article, we’ll test the `JSON_ARRAY_PACK` and `DOT_PRODUCT` vector functions with the OpenAI Wikipedia Vector Database dataset.
There is an OpenAI notebook available on GitHub under an MIT License that tests several vector database systems. The tests can be run using local clients or in the cloud. In this article, we’ll use Singlestore Helios.
Create a Singlestore Helios Account
A previous article showed the steps required to create a free Singlestore Helios account. We’ll use the following settings:
- Workspace Group Name: OpenAI Demo Group
- Cloud Provider: AWS
- Region: US East 1 (N. Virginia)
- Workspace Name: openai-demo
- Size: S-00
- Advanced Settings: MarTech Application deselected
From the left-navigation pane, we’ll select DEVELOP 〉SQL Editor to create a new database, as follows:
CREATE DATABASE IF NOT EXISTS openai_demo;Import Notebook
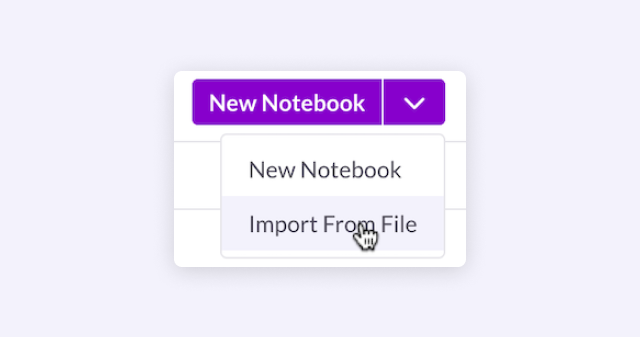
From the left-navigation pane, we’ll select DEVELOP 〉Notebooks. In the top right of the web page we’ll select New Notebook 〉Import From File, as shown in Figure 1.
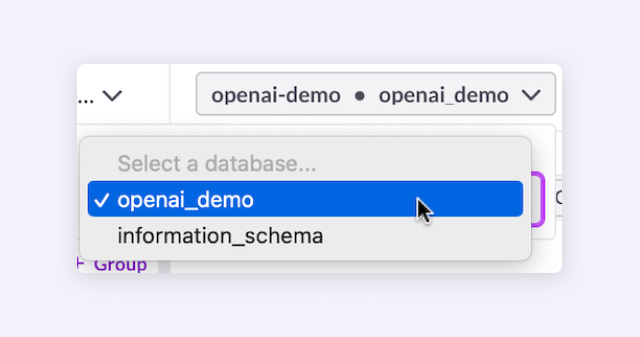
We’ll locate the .ipynb file downloaded from GitHub and import the file. We also need to ensure that we select the Connection and Database using the drop-down menus just above the Notebook, as shown in Figure 2.
OpenAI API Key
Before running the notebook, we must create an account on the OpenAI website. This provides some free credits. Since we will use embeddings, the cost will be minimal. We’ll also need to create an OpenAI API Key. This can be created from USER 〉API keys in our OpenAI account.
Work Through the Notebook
Let’s now work through the notebook. We’ll adhere to the flow and structure of the OpenAI notebook, and use some small code sections directly from the notebook where required.
Setup
First, some libraries:
!pip install openai --quiet
!pip install tabulate --quiet
!pip install wget --quiet
Next, some imports:
import openai

import pandas as pd
import wget
from ast import literal_eval
from sqlalchemy import *
and then the embedding model:
EMBEDDING_MODEL = "text-embedding-ada-002"Load data
We’ll now obtain the Wikipedia dataset:
embeddings_url =
'https://cdn.openai.com/API/examples/data/vector_database_wikipedia_ar
ticles_embedded.zip'

# The file is ~700 MB so this will take some time
wget.download(embeddings_url)
and unpack it:
import zipfile

with
zipfile.ZipFile("vector_database_wikipedia_articles_embedded.zip",
"r") as zip_ref:
    zip_ref.extractall("data")
Next, we’ll load the file into a Pandas Dataframe:
article_df = pd.read_csv(
    "data/vector_database_wikipedia_articles_embedded.csv"
)
and we’ll take a look at the first few lines, as follows:
article_df.head()The next operation from the OpenAI notebook can take a while:
# Read vectors from strings back into a list
article_df['title_vector'] =
article_df.title_vector.apply(literal_eval)
article_df['content_vector'] =
article_df.content_vector.apply(literal_eval)

# Set vector_id to be a string
article_df['vector_id'] = article_df['vector_id'].apply(str)
and then next, we’ll look at the Dataframe info:
article_df.info(show_counts=True)The result should be as follows:
<class 'pandas.core.frame.DataFrame'>
RangeIndex: 25000 entries, 0 to 24999
Data columns (total 7 columns):
 #   Column          Non-Null Count  Dtype
---  ------          --------------  -----
 0   id              25000 non-null  int64
 1   url             25000 non-null  object
 2   title           25000 non-null  object
 3   text            25000 non-null  object
 4   title_vector    25000 non-null  object
 5   content_vector  25000 non-null  object
 6   vector_id       25000 non-null  object
dtypes: int64(1), object(6)
Create table
We’ll now create a table, as follows:
%%sql

USE openai_demo;
DROP TABLE IF EXISTS wikipedia;
CREATE TABLE IF NOT EXISTS wikipedia (
    id INT PRIMARY KEY,
    url VARCHAR(255),
    title VARCHAR(100),
    text TEXT CHARACTER SET utf8mb4 COLLATE utf8mb4_general_ci,
    title_vector BLOB,
    content_vector BLOB,
    vector_id INT
);
Notice that we can enter SQL statements directly into the notebook cell using the %%sql magic command.
Populate table
We can populate our database table, as follows:
db_connection = create_engine(connection_url)

# Prepare the statement
stmt = """
    INSERT INTO wikipedia (
        id,
        url,
        title,
        text,
        title_vector,
        content_vector,
        vector_id
    )
    VALUES (
        %s,
        %s,
        %s,
        %s,
        JSON_ARRAY_PACK_F64(%s),
        JSON_ARRAY_PACK_F64(%s),
        %s
    )
"""

# Convert the DataFrame to a NumPy record array
record_arr = article_df.to_records(index=False)
# Set the batch size
batch_size = 1000

# Iterate over the rows of the record array in batches
for i in range(0, len(record_arr), batch_size):
    batch = record_arr[i:i+batch_size]
    values = [(
        row[0],
        row[1],
        row[2],
        row[3],
        str(row[4]),
        str(row[5]),
        int(row[6])
    ) for row in batch]
    db_connection.execute(stmt, values)
Loading the data should only take a few minutes. We can use other data loading methods, like pipelines, for larger datasets.
Search data
First, we’ll declare the OPENAI_API_KEY, as follows:
openai.api_key = "〈OpenAI API Key〉"Replace 〈OpenAI API Key&〉 with your key.
We’ll now define a Python function that will allow us to use either of the two vector columns in the database:
from typing import Tuple, List

def search_wikipedia(
    query: str,
    column1: str,
    column2: str,
    num_rows: int = 10
) -> Tuple[List[str], List[float]]:
    """Searches Wikipedia for the given query and returns the top
num_rows results.

    Args:
        query: The query to search for.
        column1: The name of the column in the Wikipedia database to
return for each result.
        column2: The name of the column in the Wikipedia database to
use as the score for each result.
        num_rows: The number of results to return.

    Returns:
        A list of the top num_rows results.
    """

    # Get the embedding of the query
    query_embedding_response = openai.Embedding.create(
        model=EMBEDDING_MODEL,
        input=query,
    )
    query_embedding = query_embedding_response["data"][0]["embedding"]

    # Create the SQL statement
    stmt = f"""
        SELECT
            {column1},
            DOT_PRODUCT_F64(JSON_ARRAY_PACK_F64(%s), {column2}) AS
score
        FROM wikipedia
        ORDER BY score DESC
        LIMIT %s
    """.format(column1=column1, column2=column2)

    # Execute the SQL statement
    results = db_connection.execute(stmt, [str(query_embedding),
num_rows])

    values = []
    scores = []

    # Separate the results into two lists
    for row in results:
        values.append(row[0])
        scores.append(row[1])

    # Return the results
    return values, scores
We can test SingleStoreDB using the two examples in the OpenAI notebook. First, we’ll use title and title_vector:
values1, scores1 = search_wikipedia(
    query = "modern art in Europe",
    column1 = "title",
    column2 = "title_vector",
    num_rows = 5
)
We’ll format the results using the following:
from tabulate import tabulate

# Combine the values and scores lists into a list of tuples
# Each tuple contains a value and its corresponding score
table_data1 = list(zip(values1, scores1))

# Add a rank column to the table data
table_data1 = [(i + 1,) + data for i, data in enumerate(table_data1)]

# Create the table
table1 = tabulate(table_data1, headers=["Rank", "Title", "Score"])

# Print the table
print(table1)
The output should be similar to the following:
Rank Title � Score
------ -------------------- --------
1 Museum of Modern Art 0.875124
2 Western Europe 0.867554
3 Renaissance art 0.864209
4 Pop art 0.860383
5 Northern Europe 0.854793Next, we’ll use text and content_vector:
values2, scores2 = search_wikipedia(
    query = "Famous battles in Scottish history",
    column1 = "text",
    column2 = "content_vector",
    num_rows = 5
)
We’ll format the results using the following:
# Combine the values and scores lists into a list of tuples
# Each tuple contains a value and its corresponding score
table_data2 = list(zip([value[:50] for value in values2], scores2))

# Add a rank column to the table data
table_data2 = [(i + 1,) + data for i, data in enumerate(table_data2)]

# Create the table
table2 = tabulate(table_data2, headers=["Rank", "Text", "Score"])

# Print the table
print(table2)
The output should be similar to the following:
Rank  Text                                                   Score
------  --------------------------------------------------  --------
     1  The Battle of Bannockburn, fought on 23 and 24 Jun  0.869338
     2  The Wars of Scottish Independence were a series of  0.86148
     3  Events                                              0.852533
         January 1 – Charles II crowned King of
     4  The First War of Scottish Independence lasted from  0.849642
     5  Robert I of Scotland (11 July 1274 – 7 June 1329)   0.846184
Summary
In this article, we’ve seen that SingleStoreDB can store vectors with ease — and that we can also store other data types in the same table, such as numeric and text. With its powerful SQL and multi-model support, SingleStoreDB provides a one-stop solution for modern applications bringing both technical and business benefits through a single product.
If you are interested in further reading, check out these SingleStore blog posts:
- Why Your Vector Database Should Not be a Vector Database
- AI-Powered Semantic Search in SingleStoreDB
- Using Vector Functions for Image Matching in SQL with SingleStoreDB


.png?width=24&disable=upscale&auto=webp)