
You can run SingleStore Self-Managed effectively on Windows, using the Windows Subsystem for Linux Version 2 (WSL 2). This is a development cluster running on a single host, and not suitable for production deployments – but fully capable for many development and demo tasks. You can also run Singlestore Helios for free or spin up a SingleStore cluster on Linux, on Docker Desktop, on Kubernetes, or on Vagrant, all in roughly 10 minutes. Read on to see how you can run SingleStore on WSL on Windows.
SingleStore is a Linux program exclusively, so it doesn’t run directly on other operating systems. However, Windows features WSL 2, which hosts a Linux kernel in a lightweight Virtual Machine (VM), allowing you to run any Linux program on Windows. WSL is well-regarded for its convenience and efficiency. We’ll use WSL Version 2 to run SingleStore on Windows.
The other blog posts in this series describe the process as being “in 10 minutes.” And, in this case, you can spin up the SingleStore cluster on WSL 2 in about 10 minutes. The trouble is, if you don’t already have WSL 2 in place, it also takes roughly another 10 minutes to get WSL 2 installed and updated. So we’ll say “in 20 minutes” for this one.
If you’re not all that familiar with Linux, you’ll find installing a Linux program to be much different than installing a Windows program. In Windows, we often launch an MSI, click Next a dozen times, and the program is installed. Linux administration is primarily done through the command line, with input coming from a terminal program – so we’ll use a lot of terminal commands. This might be scary on first look, but we’ll walk through this carefully to ensure you can get it running smoothly.
To run SingleStore, you’ll need a machine with at least four cores and 4GB of RAM. On Windows, you can verify your system’s specs by right-clicking on the task bar at the bottom, choosing Task Manager, and switching to the Performance tab. Look there to make sure that your machine meets the minimum requirements.
Part I: Get a Free SingleStore Dev Image
SingleStore provides free Dev Image that allow you to run a single container cluster, with community support, for as long as you’d like. You can, at any time, upgrade to an Enterprise license, which has a licensing cost attached. The Enterprise license gives you committed support resources, with a service level agreement (SLA) and the ability to run more nodes. You can contact SingleStore for more information.
To get a free license for SingleStore:
- Register at singlestore.com/try-free/
- Click the link in the confirmation email.
- Go to the customer portal and login.
- Click username/organization and select “Licenses” and you’ll see a link to your free Dev Image.
This image doesn't require a license, and is good for clusters up to 8vCPU and 32GB of RAM. This is not the license you’ll want for a production cluster, but it’s great for these “kick the tires” scenarios.
Part II: Install WSL 2 and Start Linux
Windows Subsystem for Linux Version 2 (WSL 2) debuted with Windows 10 update 2004 (May 2020 Update), and can install on any version of Windows 10, including Windows 10 Home. Though you could adapt the steps below to WSL version 1, your mileage may vary, and we have only tested these steps for WSL 2.
We’ll roughly follow Microsoft’s instructions to install WSL 2 on Windows 10: https://docs.microsoft.com/en-us/windows/wsl/install-win10
- Install all Windows Updates:
Run Windows Update by going to Start -> Settings -> Update and Security and click “Check for Updates”. Install all available updates, including the May 2020 update.

- Install Windows Subsystem for Linux:
- Click Start, type “Turn Windows Features On or Off”, and open the “Turn Windows Features On or Off” app.
- Check the boxes for both
Virtual Machine PlatformandWindows Subsystem for Linux. - Click
OKto begin the install. - Windows may invite you to reboot after this is installed.
- Set WSL to default to version 2:
Open a command prompt or PowerShell terminal by going to Start -> type “cmd”, choose Command Prompt, and type this:wsl --set-default-version 2
If this command results in an error, it means you don’t yet have Windows 10 version 2004. Return to Windows Update and check again.
- Update the Linux kernel:
In future versions of Windows, this will be done with Windows Update. For now, we need to run an installer.
Download the kernel update from https://wslstorestorage.blob.core.windows.net/wslblob/wsl_update_x64.msi and install.
- Install Ubuntu into WSL:
Open the Windows Store by going to Start -> type “Store” -> pick the Microsoft Store app.
From the search box on the top-right, type “Ubuntu” and download it. You’ll need to login to a Microsoft account to begin the download.
The Ubuntu app in the Microsoft Store will install the latest Ubuntu distribution, currently Ubuntu 20.04.
- Set Ubuntu as the default WSL kernel:
Open a command prompt or PowerShell terminal by going to Start -> type “cmd”, choose Command Prompt, and type this:
wsl --list -v
You should see a star next to Ubuntu like so:
>wsl --list -v

  NAME          STATE           VERSION

* Ubuntu        Stopped         2
If Ubuntu is not the default, set it, as follows:
wsl --setdefault Ubuntu
wsl --list -v
- Ensure it’s WSL 2:
Open a command prompt, if you don’t have one open already, and type:
wsl --list -v
This lists all your distributions. If you install Docker Desktop and enable WSL2 mode, you’ll see their kernels here too.
If any of the distributions don’t show as Version 2, update them to Version 2:
wsl --set-version Ubuntu 2
- Launch Ubuntu:
Open a command prompt and type:
wsl
This will launch your default Linux kernel. You’re now in a real, live Linux shell on your Windows box.
This is exciting! You’ll notice the terminal prompt on the left changed. It now shows forward slashes instead of backslashes. It ends with a $ instead of a >. Welcome to Linux!
The first time you launch this, it’ll invite you to create a username and password. You’ll use this password to become “root” (Administrator) in Linux.
Once the password is set, let’s exit:
exit
We’re now back at the regular Windows terminal.
Windows Subsystem for Linux version 2 (WSL2) is now installed. Next, let’s tweak it slightly.
Part III: Configure WSL
In this section, we’ll ensure WSL has enough (but not too much) resources to run. Then we’ll enable the user to run privileged Linux commands without a password, required for cluster setup. (Windows calls it administrator, but in Linux we call it super user or su. The Linux sudo command sudo is short for “superuser do.”) Finally, we’ll get all available updates.
1. .wslconfig:
Open Windows Explorer in your user home directory (typically c:/Users/yourname). Click in the address bar – just below the ribbon tabs, and above all the files – and type:
cmd
This will create a command prompt in this directory.
Next type this:
echo [wsl2] > .wslconfig
This creates the .wslconfig file and ensures it doesn’t have a .txt extension.
Open this .wslconfig file in your favorite editor, such as Notepad.
Edit the file to look like this:
[wsl2]
memory=4GB
processors=4
Adjust these values to be between 4 and 32 gigs ram, and 4 or more processors, and to be less than or equal to your machine’s resources. SingleStore’s Dev Image works on up to 32 gigs RAM, and we’ll only run one leaf.
- Run as
rootwithout requiring a password:
Open a terminal in any directory and launch the visudo tool by typing:
wsl sudo visudo
visudo is the program used to edit the sudoers file. This file lists programs and users that are allowed to switch to root without a password.
Use the arrow keys to get to the bottom of the file, and then add this line, swapping in your username:
rob ALL=(ALL) NOPASSWD:ALL
Usernames are case-sensitive. In Windows, my login is Rob, but as I setup WSL, I chose rob, so I entered all lower-case here. (The Microsoft world tends to prefer mixed case, whereas the Unix world prefers – and sometimes requires – all lower-case.)
Type cntrl + x to exit, and choose Y to save.
Test that it works correctly by typing:
sudo
Verify it doesn’t prompt you for your password.
Exit out of the shell:
exit
- Update Ubuntu:
Open a command prompt or PowerShell window.
Get into WSL as root:
wsl sudo su
You can verify you’re at a root prompt because your terminal starts with root@.
Update Ubuntu by typing:
apt-get update
apt-get upgrade -y
apt-get dist-upgrade -y
apt-get autoremove -y
Exit out of the Linux shell:
exit
You may wish to run these Linux upgrade commands periodically to keep Ubuntu updated. In future versions of Windows, the system may run these commands for you, as part of Windows Update.\ We’ve now opened a terminal, launched into Linux, became root, and run commands twice now. This is easy!
Part IV: Install SingleStore
The memsql-deploy command in SingleStore Tools has a “dev image” flag that installs one master node and one leaf node on a single machine. (Confusingly, there’s also a SingleStore “dev-image” Docker container.) In this tutorial we’ll use the SingleStore Tools command to quickly provision a test cluster. This is a configuration that can run on a single machine/server, with minimal resources.
With WSL 2 installed and configured, we’re now ready to install SingleStore into Ubuntu. We’ll roughly follow the install docs from https://archived.docs.singlestore.com/v7.1/guides/deploy-memsql/self-managed/linux/step-1/ to install SingleStore’s “dev image” configuration onto Ubuntu running on Windows.
1. Install SingleStore management tools
Note: Like all Linux software installations, SingleStore must be installed as root (Administrator).
Open a Windows command prompt by going to Start -> type “cmd” -> choose Command Prompt, and in the terminal type:
wsl sudo su
You’re now in Linux as root. You can verify this because your terminal will have changed to show root@ at the beginning.
From the Linux terminal as root, type (copy/paste) these lines:
wget -O - 'https://release.singlestore.com/release-aug2018.gpg'  2>/dev/null | apt-key add -

apt-key list

apt install -y apt-transport-https

echo "deb [arch=amd64] https://release.singlestore.com/production/debian memsql main" | tee /etc/apt/sources.list.d/memsql.list

apt update

apt install -y memsql-toolbox memsql-client memsql-studio
Be careful of long lines here. Some of these commands may wrap to a second in this post, and if so, make sure you enter them as a single command.
After these lines finish, you’ll have these pieces installed (but not running) in WSL:
- memsql-toolbox: A suite of command-line tools for installing and configuring SingleStore clusters.
- memsql-client: This allows you to type memsql at a Linux command prompt and run queries against the database. This tool can be handy for scripting backups or tweaking data.
- memsql-studio: This is a browser-based administration and query tool designed for use with SingleStore.
All of these tools are installed, but none are running yet. We also haven’t yet provisioned our cluster.
Exit the shell:
exit
2. Create a SingleStore Cluster
Note: Unlike installing software, creating the cluster needs to be done as a regular user, not as root.
Open a Windows command prompt by going to Start -> type “cmd” -> choose Command Prompt and type:
wsl
This will start WSL 2, rather than WSL 1, because we specified that above.
Create a “Dev Image” SingleStore cluster:
memsql-deploy dev-image --password YOUR_PASSWORD_HERE
Alternatively, you can run the setup wizard, and configure the cluster in a browser.
Also alternatively, you can create a YAML file describing your cluster and run memsql-deploy setup-cluster –cluster-file memsql.yml
3. Verify the Cluster is Running
Open a Windows command prompt by going to Start -> type “cmd” -> choose Command Prompt, and type:
wsl memsql-admin list-nodes
Note in the output both nodes are running:
>wsl memsql-admin list-nodes

+------------+--------+-----------+------+---------------+--------------+---------+----------------+--------------------+--------------+

| SingleStore ID  |  Role  |   Host    | Port | Process State | Connectable? | Version | Recovery State | Availability Group | Bind Address |

+------------+--------+-----------+------+---------------+--------------+---------+----------------+--------------------+--------------+

| 850151AEC3 | Master | localhost | 3306 | Running       | True         | 7.1.4   | Online         |                    | 0.0.0.0      |

| D77EEB532D | Leaf   | localhost | 3307 | Running       | True         | 7.1.4   | Online         | 1                  | 0.0.0.0      |

+------------+--------+-----------+------+---------------+--------------+---------+----------------+--------------------+--------------+
4. Start SingleStore UI
SingleStore UI is the browser-based database administration and SQL Query tool. In most configurations we’d run this as a Linux service, but systemd is not available in WSL2, so we’ll run it as a background process.
Open a Windows command prompt by going to Start -> type “cmd” -> choose Command Prompt, and type:
wsl sudo su
We’re straight into a root prompt.
Let’s start SingleStore UI as a background process:
memsql-studio &>/tmp/memsql-studio.log &
You can close this terminal, and SingleStore UI will stay running until you reboot.
Register the SingleStore cluster with SingleStore UI:
Open a browser to http://localhost:8080/
WSL automatically proxies traffic between the local machine and the Linux kernel running in WSL2. This makes it “magically” work on localhost. Perfect!
- Click “Add or Create Cluster”.
- Click “Add an Existing Cluster”.
- Set Hostname to
localhostand port to3306. - Enter credentials: username is
root, and use the password you set running thememsql-deploycommand when installing the cluster. - Set the Environment to “Development”, and set the cluster name and description to “localhost”.
With all these set, the “Submit” button on the bottom right lights up.
- Click “Submit”.
You’re now logged into the cluster.
Part V: Use SingleStore
With the SingleStore cluster running, and SingleStore Studio started, we’re ready to login and start using the database.
1. Launch SingleStore Studio
Open a browser to http://localhost:8080/
If you’re not logged in already, choose localhost cluster, enter username of root and your password.
2. Run Queries
Click on the SQL Editor tab on the left.
In the SQL window, run each of these queries by pasting it into place and pushing the run button on the top right:
Loading gist, please wait...
3. Check the Results
After the SELECT command, you should see the row in the database on the bottom pane.
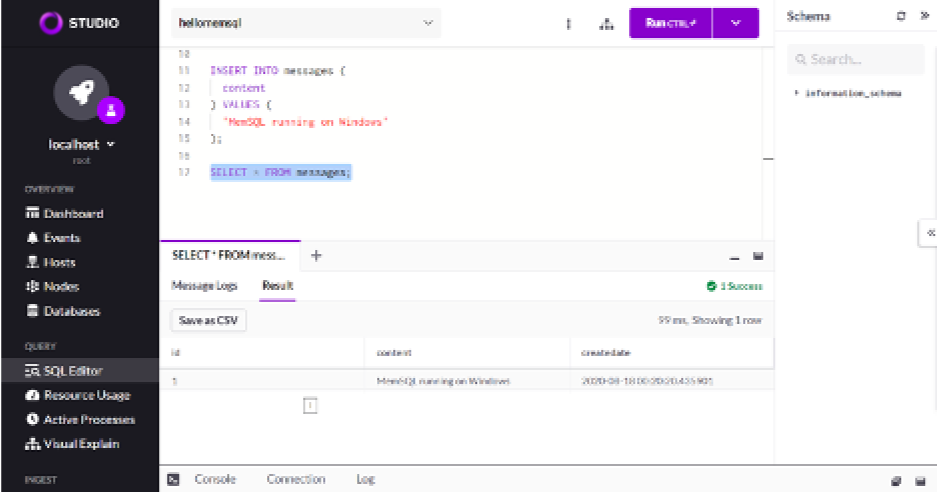
It worked!
Part VI: Connect your App
SingleStore is wire-compatible with MySQL, so you can use most MariaDB or MySQL drivers and admin tools to connect to SingleStore.
For example, you could write a C# program to connect to the database created above:
APPENDIX
Restarting the Cluster
If you reboot your machine or shut down the WSL2 kernel, you’ll need to restart the SingleStore cluster and the SingleStore Studio browser-based admin tool.
1. Restart the cluster
Open a terminal and type:
wsl memsql-admin start-node --all -y
Verify it’s running:
wsl memsql-admin list-nodes
2. Restart SingleStore Studio
Open a terminal and type:
wsl sudo su
memsql-studio 2>&1 /tmp/memsql-studio.log &
Verify it’s running:\http://locahost:8080/
You can close this terminal and SingleStore Studio will continue running until you reboot.
Stopping the Cluster
By default, when Windows turns off the WSL Linux Kernel, it just stops all the processes. If you’d like, you can shut down SingleStore more gently before this happens.
1. Shut down the cluster
Open a terminal and type:
wsl memsql-admin stop-node --all -y
2. Verify it’s stopped
wsl memsql-admin list-nodes
Specifically Stopping WSL2 Kernel
In most cases, you don’t need to specifically stop the WSL2 kernel, as Windows handles this automatically. But in the rare case you need this, it can be handy:
1. Shutdown WSL
Open a terminal and type:
wsl --shutdown
2. Verify the kernel is stopped
wsl --list -v


.png?width=24&disable=upscale&auto=webp)