The exploration and utilization of embeddings is a fascinating field within machine learning and data science, and is now an accessible one.
Whether you are an experienced data scientist or just starting your journey in the world of embeddings, this blog post offers a comprehensive guide to creating them at scale using SingleStoreDB.
In this detailed walkthrough, we will be focusing on the integration of OpenAI's text-embedding-ada-002 model, striving to keep our solution as model agnostic and data source independent (still SingleStoreDB 😉) as possible.
I recommend using Visual Studio Code (VS Code) as your development environment for this tutorial. It offers excellent support for Docker, making it easy to manage and organize your files.
We've created a template for this architecture making it super easy for you to replicate these steps and get real-time embeddings on your data. You can access the files in this tutorial through our Github repo.
What you will learn
You’ll start by understanding how to generate embeddings for a specific textual column, diving into the methodologies that allow for optimal representation. You'll explore the most effective ways to insert these embeddings into SingleStoreDB, leveraging the capabilities of the SingleStore Python Client.
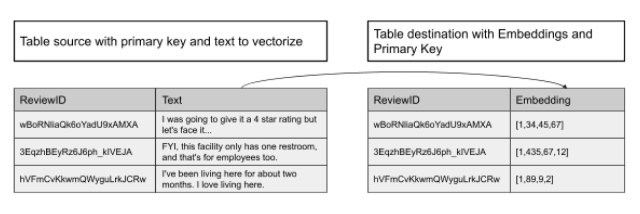
Second, you will learn how to scale up your embedding creation process through a serverless architecture. This section will guide you on how to automatically create embeddings for newly ingested data that lacks existing embeddings in the table. This is a practice that many of our clients are embracing, enabling them to perform semantic searches on their most recent data.
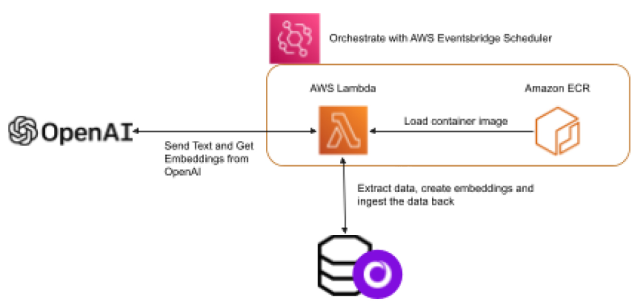
Third, you will learn to make your code both secure and adaptable by applying environment variables to your Lambda functions. You will be guided on how to ensure your code is free of sensitive information like keys and secrets, and how to introduce flexibility by easily changing table sources, destinations or even the model itself.
Finally, you will use a scheduler to automate when and how often your Lambda function will run.
Create your Lambda function
Step 1: Import the required libraries
We'll start by importing essential libraries for accessing OpenAI URLs, reading tables, ingesting embeddings into SingleStoreDB and managing environment variables. Requests libraries will be used to access OpenAI URL, singlestoredb and struct libraries will be used to read tables and ingest efficiently embeddings back into SingleStoreDB; os library will be used to get environment variables within your python script.
1#Import libraries2import os3from struct import pack4import requests5import singlestoredb as s2
Step 2: List all the variables
These variables will help us set various configurations like limits, tables, connection details and OpenAI model parameters.
1limit = int(os.getenv('LIMIT', '10')) # Set a limit on how many rows you want to2read and write back3source_table = os.environ.get('SOURCE_TABLE', 'reviews_yelp') # Set which source4table you want to read data from5source_table_PK= os.environ.get('SOURCE_TABLE_PK', 'review_id') # Set which column6in the source table is the primary key7source_table_text_column = os.environ.get('SOURCE_TABLE_TEXT_COLUMN', 'text') # Set8which column in the source table contains the text that you want to embed9destination_table = os.environ.get('DESTINATION_TABLE', 'reviews_yelp_embedding') #10Set which destination table you will write data into - if that table doesn;t exist,11we create it in the script12db_endpoint = os.environ.get('ENDPOINT', '') # Set the host string to13SingleStoreDB. It should look like svc-XXXX.svc.singlestore.com14connection_port = os.environ.get('CONNECTION_PORT', '3306') # Set the port to15access that endpoint. By default it is 330616username = os.environ.get('USERNAME', '') # Set the username to access that17endpoint18password = os.environ.get('PASSWORD', '') # Set the password for the username to19access that endpoint20database_name = os.environ.get('DATABASE_NAME', '') # Set the database name you21want to access22API_KEY = os.environ.get('OPENAPI_API_KEY', '') # Set the API Key from OpenAI23EMBEDDING_MODEL = os.environ.get('EMBEDDING_MODEL', '') # Define which OpenAI model24to use25URL_EMBEDDING = os.environ.get('URL', 'https://api.openai.com/v1/embeddings') # URL26to access OpenAI27BATCH_SIZE = os.environ.get('BATCH_SIZE', '2000') # Set how many rows you want to28process per batch
Step 3: Configure connections to SingleStoreDB and OpenAI
We will set up two connections to SingleStoreDB for reading and writing, and configure the connection to OpenAI.
1fetch_conn = s2.connect(host=db_endpoint, user=username, password = password,2database=database_name)3insert_conn = s2.connect(host=db_endpoint, user=username, password = password,4database=database_name)5
6#Configure Header and connections7HEADERS = {8'Authorization': f'Bearer {API_KEY}',9'Content-Type': 'application/json',10}
Step 4: Writing the core functionality
Extract the data to vectorize
We'll define a handler function to create the destination table if it doesn't exist, and read the source data.
1def handler(event, context):2fetch_cur = fetch_conn.cursor()3query_create_table = '''4CREATE TABLE IF NOT EXISTS {} (5{} text, embedding blob, batch_index int, usage_tokens_batch int, timestamp 6datetime, model text)'''.format(destination_table,source_table_PK)7fetch_cur.execute(query_create_table)8query_read = 'select {}, {} from {} where {} NOT IN (select {} from {}) limit9%s'.format(source_table_PK,source_table_text_column,10source_table,source_table_PK,source_table_PK, destination_table)11fetch_cur.execute(query_read, (limit,))
Create the embeddings
This step involves processing the text column and making calls to the OpenAI endpoint to create embeddings.
1   fmt = None2
3    while True:4        rows = fetch_cur.fetchmany(BATCH_SIZE)5        if not rows: break6
7        res = requests.post(URL_EMBEDDING,8                            headers=HEADERS,9                            json={'input': [row[1].replace('\n', ' ')10                                            for row in rows],11                                  'model': EMBEDDING_MODEL}).json()12
13        if fmt is None:14            fmt = '<{}f'.format(len(res['data'][0]['embedding']))
Ingest the embedding
Finally, we'll ingest the embeddings back into the destination table.
1
2       insert_embedding = 'INSERT INTO {} ({},3embedding,batch_index,usage_tokens_batch,timestamp,model) VALUES (%s, %s,4%s,%s,now(),%s)'.format(destination_table,source_table_PK)5
6        data = [(row[0], pack(fmt, *ai['embedding']), ai['index'],7res['usage']['total_tokens'], EMBEDDING_MODEL) for row, ai in zip(rows,8res['data'])]9
10        insert_conn.cursor().executemany(insert_embedding, data)
Function
This Lambda function sets up a streamlined process for extracting text, creating embeddings and ingesting them back into SingleStoreDB, all orchestrated through a serverless architecture. It demonstrates a practical approach to working with textual data at scale. Here is all the preceding code stitched together. Call that file lambda_function.py.
1#Import libraries2import os3from struct import pack4import requests5import singlestoredb as s26
7# List the variables8limit = int(os.getenv('LIMIT', '10')) # Set a limit on how many rows you want to9read and write back10source_table = os.environ.get('SOURCE_TABLE', 'reviews_yelp') # Set which source11table you want to read data from12source_table_PK= os.environ.get('SOURCE_TABLE_PK', 'review_id') # Set which column13in the source table is the primary key14source_table_text_column = os.environ.get('SOURCE_TABLE_TEXT_COLUMN', 'text') # Set15which column in the source table contains the text that you want to embed16destination_table = os.environ.get('DESTINATION_TABLE', 'reviews_yelp_embedding') #17Set which destination table you will write data into - if that table doesn;t exist,18we create it in the script19db_endpoint = os.environ.get('ENDPOINT', '') # Set the host string to20SingleStoreDB. It should look like svc-XXXX.svc.singlestore.com21connection_port = os.environ.get('CONNECTION_PORT', '3306') # Set the port to22access that endpoint. By default it is 330623username = os.environ.get('USERNAME', '') # Set the username to access that24endpoint25password = os.environ.get('PASSWORD', '') # Set the password for the username to26access that endpoint27database_name = os.environ.get('DATABASE_NAME', '') # Set the database name you28want to access29API_KEY = os.environ.get('OPENAPI_API_KEY', '') # Set the API Key from OpenAI30EMBEDDING_MODEL = os.environ.get('EMBEDDING_MODEL', '') # Define which OpenAI model31to use32URL_EMBEDDING = os.environ.get('URL', 'https://api.openai.com/v1/embeddings') # URL33to access OpenAI34BATCH_SIZE = os.environ.get('BATCH_SIZE', '2000') # Set how many rows you want to35process per batch36
37#Configure Header and connections38HEADERS = {39    'Authorization': f'Bearer {API_KEY}',40    'Content-Type': 'application/json',41}42
43fetch_conn = s2.connect(host=db_endpoint, user=username, password = password,44database=database_name)45insert_conn = s2.connect(host=db_endpoint, user=username, password = password,46database=database_name)47
48# Lambda function49def handler(event, context):50    fetch_cur = fetch_conn.cursor()51    query_create_table = '''52    CREATE TABLE IF NOT EXISTS {} (53    {} text, embedding blob, batch_index int, usage_tokens_batch int, timestamp54datetime, model text)'''.format(destination_table,source_table_PK)55    fetch_cur.execute(query_create_table)56    query_insert = 'INSERT INTO {} SELECT * FROM yelp.reviews_all_v2 ra where ra.{}57NOT IN (select {} from {}) LIMIT58%s'.format(source_table,source_table_PK,source_table_PK, source_table)59    fetch_cur.execute(query_insert, (limit,))60    query_read = 'select {}, {} from {} where {} NOT IN (select {} from {}) limit61%s'.format(source_table_PK,source_table_text_column,62source_table,source_table_PK,source_table_PK, destination_table)63    fetch_cur.execute(query_read, (limit,))64
65    fmt = None66
67    while True:68        rows = fetch_cur.fetchmany(BATCH_SIZE)69        if not rows: break70
71        res = requests.post(URL_EMBEDDING,72                            headers=HEADERS,73                            json={'input': [row[1].replace('\n', ' ')74                                            for row in rows],75                                  'model': EMBEDDING_MODEL}).json()76
77        if fmt is None:78            fmt = '<{}f'.format(len(res['data'][0]['embedding']))79
80        insert_embedding = 'INSERT INTO {} ({},81embedding,batch_index,usage_tokens_batch,timestamp,model) VALUES (%s, %s,82%s,%s,now(),%s)'.format(destination_table,source_table_PK)83        data = [(row[0], pack(fmt, *ai['embedding']), ai['index'],84res['usage']['total_tokens'], EMBEDDING_MODEL) for row, ai in zip(rows,85res['data'])]86
87        insert_conn.cursor().executemany(insert_embedding, data)
Package your files for AWS Lambda and Amazon Elastic Container Registry
When working with AWS Lambda, especially if you need to include larger images containing heavy libraries, it might be beneficial to create a Docker container. This approach enables greater flexibility in managing dependencies, and allows you to work with more extensive packages that may not be suitable for a typical Lambda deployment package.
Follow the official AWS documentation for creating a Python Docker image specifically for AWS Lambda. The guide provides a detailed walkthrough, which you can find here.
In the same folder where your lambda_function.py is located, create a file named requirements.txt. This file will list all the necessary libraries your function depends on — be sure to include any library that your code uses, as this guarantees they are installed within the Docker container.
Here's what the requirements.txt file should contain:
1singlestoredb2sqlalchemy_singlestoredb
If you followed the documentation link above, you should also have a Docker file with the following attributes:
1FROM public.ecr.aws/lambda/python:3.1123# Copy requirements.txt4COPY requirements.txt ${LAMBDA_TASK_ROOT}56# Copy function code7COPY lambda_function.py ${LAMBDA_TASK_ROOT}89# Install the specified packages10RUN pip install -r requirements.txt1112# Set the CMD to your handler (could also be done as a parameter override outside13of the Dockerfile)14CMD [ "lambda_function.handler" ]
If you followed the previous documentation link, you should have your image deployed in Amazon Elastic Container Registry (ECR).
Create and configure the Lambda Function
Now you need to create your AWS Lambda function through the AWS console in the AWS Lambda service.
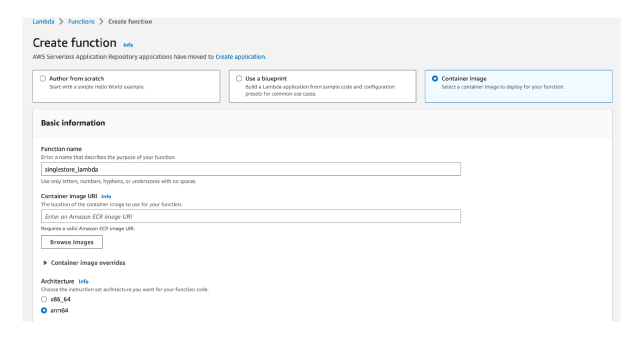
- Select Container image
- Enter the name of your function. I use singlestore_lambda
- Select Browse images
- Select the repository for your image in the dropdown
- Select the image you want. The image you just published should have the image tag latest
- Click on Select image
- If you have developed on ARM (like me on a Mac M1), you should select arm64 over x86_64
- Click on Create function
Now go to the Configuration and do the following:
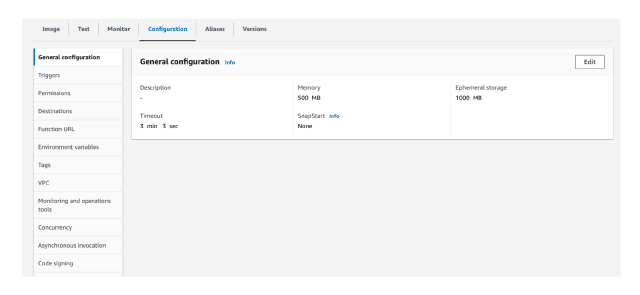
- In the General configuration tab ( if you want to create several embeddings at once), you can tweak the following to increase speed of ingestion:
- Increase Timeout to 1 minute
- Increase Memory to 500 MB
- Go to the Environment variables tab and enter the following — this is where you pass on all the environment variables from lambda_function.py:
| Key | Value |
| USERNAME | Your own entry (oftentime we use admin for trials) |
| PASSWORD | Your username password |
| ENDPOINT | Your SingleStore endpoint svc-XXX-dml.aws-virginia-5.svc.singlestore.com |
| CONNECTION_PORT | 3306 |
| DATABASE_NAME | Your own entry |
| SOURCE_TABLE | Your own entry |
| SOURCE_TABLE_TEXT_COLUMN | Your own entry |
| SOURCE_TABLE_PK | Your own entry |
| DESTINATION_TABLE | Your own entry |
| LIMIT | 1000 (but you can change it if you want to process more text at once) |
| BATCH_SIZE | 2000 (but you can change the size depending on the speed required) |
| URL | https://api.openai.com/v1/embeddings |
| OPENAPI_API_KEY | Your OpenAI API Key |
| EMBEDDING_MODEL | text-embedding-ada-002 |
Now go to the Test Tab and click on Test. You should get the following results:
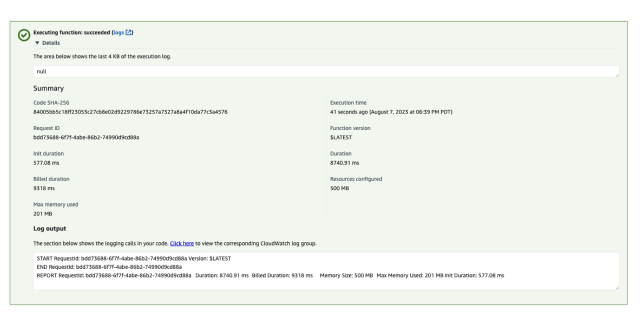
Schedule your function with Amazon EventBridge
On Amazon EventBridge, go to Schedules under Scheduler, create a schedule and do the following:
- Enter a Schedule name
- Under Schedule pattern, enter the following:
- Occurrence: Select Recurring schedule
- Schedule type: Select Rate-based schedule
- Under Rate expression:
- Enter 1 as Value
- Select minutes as Units
- From the Templated targets, select AWS Lambda
- In Invoke, select the lambda function you have created above
- Select Next
- Select Next (no need to change the options)
Your Lambda function will now run every 1 minute.
Wrap-up
So what have we demonstrated here? We have shown how you can operationalize the creation of embeddings against any table in SingleStoreDB using a third- party service likeOpenAI. Behind the scenes, our Python Client makes the ingestion of embeddings simple and super fast.
Try SingleStoreDB for free now!
Additional resources